Quantcast
Channel: Computers – GearOpen
Viewing all 3641 articles
Browse latest View live

CENAVA F14 Review

$
0
0

Maximum of the people believe that a laptop that is capacitated to play videos and gameplay is the best one. However, we have brought a laptop that comprises of different specifications which are altogether more impressive and worthwhile. CENAVA F14 Notebook is comes flooded with applications and executes all your important task on a serious note. You can work and play on it anytime you feel like.

Here we are going to talk about the CENAVA F14 Notebook so that you can make up your mind to own one. Let’s know about the exceptional features of CENAVA F14 Notebook that would stimulate your desire to own it vigorously .

Design

Kết quả hình ảnh cho CENAVA F14

CENAVA F14 Notebook resembles with chuwi 14.1. The overall body weight of the product is 1.2000 kg and makes it convenient to be carried anywhere you feel like. You can carry it at your back for an accounting any kind of inconvenience that a computer may give you. The package comes with briefcase, charger and the laptop set.CENAVA F14 Notebook Review

The latest model brags about full HD resolution of 1920 X 1080 pixels with 14-inch IPS screen. The product has reduced frame for giving you a better advantage of the display. The thickness is just 9-millimeter so that the panel occupies practically laser space for making the equipment more useful. As far company introduced this notebook with only one color as White. In this color, the notebook is looking good and attractive as well.

Hardware

Coming straight to the hardware of the product, CENAVA F14 Notebook is blessed with Intel Celeron N3450 Quad-Core processor that runs up to 2.2 gigahertz speed. If you using this notebook for general work like Accounting, some office work then it can perform all of your tasks seamlessly. Apart from that, it can also do other stuff like watching movies, some kind of editing stuff on Camtasia, flimora.

The on-chip Intel graphics will let you do the other stuff like play games and show the videos on a very good quality. It comes with 6 GB DDR4 Ram and 64GB internal storage for the user. The  64GB ROM is not enough for users so for that you need to buy an external hard disk. The RAM is enough and it can run all the software and games like CS, NFC Most wanted etc.

Kết quả hình ảnh cho CENAVA F14 laptop

Operating system

Already mentioned above, the CENAVA F14 Notebook comes with Windows 10 operating system. It is the most convenient option if you have never been introduced to Mac or Android-based laptops up till now. The quick review of Windows 10 let you know about its weaknesses and strength on the moment. Despite being slightly complicated, Windows 10 operating system easiest to learn. It is the best for every kind of professional and normal person.

Windows 10 is indeed the most flexible operating system that is embedded in the maximum of the latest models. Although, Windows 10 model range quite exceptionally High, yet this laptop has been priced considerably low. The improvisation of several features and the ability to use follow up questions is not available in any of the operating systems so far.

Keyboard & Touchpad

The most important specification of a laptop is about accurate hardware integration. The solid tactile feedback and plenty of vertical travel provide a lot of conveniences while you type in the laptop. More about the Touchpad is not at all about a jumping cursor that consistently hinders with your work. Hence, even if you’re looking forward to owning the CENAVA F14 Notebook for the business purpose, you are going to roam around everywhere with it.

The keys of the Notebook is soft and alphabets are easily identifying with a small gesture. The one thing is missing is backlight, it doesn’t have that. So in the night it hard to type fast. The touchpad is good and big in size. You can easily roam the all-around screen with one click.

Connectivity

CENAVA F14 Notebook Review

CENAVA F14 Notebook has been embedded with Bluetooth 4.0, WIFI and USB support as a connection option. It also has round DC – in connector for allowing you to charge it through the USB port. Additionally, it has Mini HDMI video output jack, 3.5 audio jack, and micro SD card reader. You can connect a streaming Box with a laptop to convert it into a full-fledged television. With 9000 MaH battery power there is no need for you to waste your energy in repeatedly charging the laptop. The Windows 10 operating system for the exaggerate your experience.

Price

The Splendid laptop comes with top Intel Celeron NOC for ensuring amazing performance when paired with 6 GB RAM. The combination of good internal and better RAM makes it an amazing gadget at a low price. The product is amazingly beneficial if you are going to work on internet and word on it.

The screen size of 14.1 inch makes it an ideal choice for usability and portability. It’s not bad to own a laptop with largest screen size if you must remain at home. However, currently the models with medium screen size gaining more important. Since you are spending $248 in the device, they can be nothing better than this.

Conclusion

Besides all the configuration mentioned above, the CENAVA F14 Notebook comes with YouTube support, plastic cover back, mic support, Skype, built in speakers and dual language support. You get a Chinese manual for understanding the basics of the laptop.

(technosoups.com, https://goo.gl/S9AhKh)


Intel NUC 7 Home Unboxing, Hands-on Review : First Impressions

$
0
0

Desktop PC’s are often thought of as large hunks that take up a bunch of space, but with the amount of AiO’s and small-form-factor PC’s there are right now, that doesn’t have to be the case. Intel’s NUC line of tiny PC’s isn’t new. They’ve been around since the Sandy Bridge generation of Intel processors, which to some people, was a long time ago.

Today, we’ll be checking out the Intel NUC 7 Home, a sweet spot NUC that on paper, is perfect for simple home, office, and school use. But first, let’s see what’s inside the box.

Aside from the NUC itself, you get the power adapter, VESA mounting hardware so that you can stick it behind your monitor and be done with it, and of course, the documentation.

Moving on to the NUC, the overall design is decent but misses a huge opportunity due to one flaw. It’s nice and compact with a good amount of air vents, a nice selection of ports, and has a solid feel thanks to its aluminum chassis. The aluminum has a very nice color and texture to it, but the NUC does not look premium overall due to the shiny plastic top cover. It is a huge dust and fingerprint magnet and gives the computer a cheap look.

As for I/O, the NUC 7 Home does it right. For starters, the front panel has two USB 3.0 ports, a combo audio port, and the power button.

The left side has a micro SD card slot and Kensington lock. Found here as well as at the opposite side are the main air intakes of the chassis.

The back is where the party is at. The main air exhaust is found here, as well as the DC power input, HDMI out, Ethernet, two more USB 3.0 ports, and Thunderbolt 3.

It may seem pretty barebones to some of you, but consider that this is a machine intended for basic Windows use. All the included I/O will pretty much be all the intended users will need.

The NUC can easily be kept out of sight via an included VESA mount that allows you to mount it behind your monitor.

The power supply has a few features that are very welcome. It has a long cable with an included velcro strap and a modular wall plug system, which includes plugs for pretty much every region.

This particular Intel NUC 7 Home is powered by an Intel Core i5-7260U, Intel Iris Plus 640 graphics, 4GB of DDR4 RAM, and a 1TB SATA SSD paired with a 16GB Intel Optane module. On paper, these specs should be more than adequate for home, office, school, or media consumption use. Actual testing will have to wait ’til our full review.

Intel NUC 7 Home specs:
  • Intel Core i5-7260U
  • Intel Iris Plus 640 graphics
  • 4GB DDR4-2400MHz RAM
  • 1TB SATA 3 HDD
  • 16GB Intel Optane Memory
  • Thunderbolt 3
  • Intel Dual Band Wireless 802.11ac
  • Bluetooth 4.2
  • Intel Gigabit LAN
  • Micro SD card slot
  • Windows 10 Home

(yugatech.com, https://goo.gl/m9hPE5)

PowerSpec 1710 and PowerSpec 1510 review: Formidable gaming laptops at great prices

$
0
0

Micro Center’s notebooks offer great bang for your buck, but ship with a flagship feature disabled.

powerspec primary

Savvy electronics shoppers know Micro Center as the go-to retailer for mouthwatering CPU deals if you’re lucky enough to live near one. The company’s first-ever homegrown gaming laptops continue that devotion to damned good prices. Despite packing a full-fat GeForce GTX 1070 and other high-end hardware, the aluminum-clad PowerSpec 1510 costs a mere $1,300, and the PowerSpec 1710 just $1,400. (With in-store pickup only, of course—this is Micro Center.) That’s surprisingly little cash for such potent portable PCs!

Nvidia’s gameplay-smoothing G-Sync technology is disabled by default though, making you jump through hidden and arcane hoops to get the best experience on the PowerSpec laptops—and one of these is definitely the better buy.

PowerSpec 1510 and PowerSpec 1710 specs, features, and price

The 15.6-inch PowerSpec 1510 and 17.3-inch PowerSpec sport identical core hardware. Externals are another story. The Micro Center laptops use two very different Clevo cases, and that leads to two wildly different user experiences.

  • CPU: Core i7-7700HQ
  • GPU: Nvidia GeForce GTX 1070
  • RAM: 16GB DDR4/2400
  • Storage: 1TB HGST 7200RPM hard drive, 250GB Samsung 960 EVO NVMe M.2 SSD
  • Wireless: 802.11ac, Bluetooth 4.1
  • Display (1710): 17.3-inch, 60Hz 1920×1080 IPS, or 75Hz with G-Sync active (disabled by default)
  • Display (1510): 15.6-inch, 60Hz 1920×1080 IPS, G-Sync (disabled by default)
  • Weight (1710): 6 lb. 14.6 oz., or 8 lb. 14.2 oz. with power brick
  • Weight (1510): 6 lb. 9.4 oz., or 8 lb. 14.4 oz. with power brick
  • Dimensions (1710): 16.5 x 11.5 x 1 inches
  • Dimensions (1510): 15.25 x 10.75 x 1.25 inches
  • Webcam: 1080p
  • Price: $1,300 for PowerSpec 1510, $1,400 for PowerSpec 1710

We’ll discuss the port selection as part of the overall design talk in a later section.

You won’t find any lightweight Nvidia Max-Q subtlety here. The GeForce GTX 1070 lurking inside is the full-fat version, and the PowerSpec laptops are old-school bruisers at an inch (or more!) thick and nearly 7 pounds. of heft before you add in the power brick. That raw bulk lets Micro Center cram top-of-the-line hardware into the PowerSpec 1510 and PowerSpec 1710. With a Core i7-7700HQ, 16GB of RAM, and a helpfully fast Samsung 960 EVO NVMe boot drive, these beasts were built to spit out blistering frame rates.

The curious case of (kinda) missing G-Sync

But bizarrely, G-Sync—the Nvidia technology that synchronizes the refresh rate of the GPU and display to eliminate tearing and stuttering—isn’t active by default. The Nvidia Control Panel won’t let you turn it on, either. What?

powerspec bios

You need to dive into the PowerSpec laptop’s throwback BIOS to activate G-Sync.

As it turns out, the PowerSpec laptops ship with Microsoft Hybrid Graphics mode enabled by default. Hybrid mode switches off the discrete GPU and shifts the workload over to the Intel CPU’s integrated graphics when face-melting visual power isn’t required. It saves battery life, but G-Sync won’t—can’t—function using Hybrid mode. G-Sync demands secret sauce from Nvidia GPUs 100 percent of the time. To activate G-Sync, you need to boot into the system BIOS and head to the Advanced tab. There, select Advanced Chipset Controland change the “MSHybrid or DISCRETE Switch” option to Discrete. Reboot the PC, give the system a second to think, and you’ll receive a prompt to enable G-Sync in the Nvidia Control Panel.

Fortunately you’ll only need to this once—but it’s ludicrous that you need to do it at all. The PowerSpec laptops ship with a flagship feature disabled. Worse, the activation’s hidden behind an arcane process that’s never made obvious to end users. And get this: Switching to the discrete GPU bumps the PowerSpec 1710’s display refresh rate from the default 60Hz up to 75Hz. (No such luck on the PowerSpec 1510, alas.) I’ve never seen a laptop configured this way and honestly, the only reason I puzzled out the solution was because I saw an Intel graphics option while right-clicking the desktop and was savvy enough to recognize what that indicated. It’s not consumer-friendly whatsoever.

powerspec laptop 5

The PowerSpec 1710.

Once you’ve gotten that all squared away, the results are spectacular. Both Micro Center notebooks boast vivid displays with wide viewing angles. The PowerSpec 1510 is no slouch with its better-than-average 317 nits of brightness, but the PowerSpec 1710 maxes out at an eye-searing 411 nits—easily one of the brightest displays we’ve seen, alongside the Alienware R15 and monstrous Acer Predator 21 X. With G-Sync active, gaming on these displays with the GTX 1070’s raw power is nothing short of glorious.

The big difference: Physical design

The PowerSpec laptops rely on Clevo cases. These are classic big, heavy gaming laptops—though far from the heaviest we’ve seen. Both designs sport a slick-looking (and fingerprint-prone) black casing, but differ greatly in other aspects.

The PowerSpec 1510 is the thicker of the two at 1.25 inches, but slightly more compact than its sibling at 15.25 x 10.75 inches.  Ports abound on this beast, and on almost every edge. You’ll find a Mini-DisplayPort, a pair of USB 3.1 Type-C ports, and a pair of standard USB 3.1 Type-A connections on the leftmost edge. On the right edge, there’s another USB 3.1 Type-A connection, an ethernet jack, an SD card slot, a Kensington lock slot, and microphone, headphone, and line out jacks. Finally, you’ll find power input, a full-sized HDMI connection, and another Mini-DisplayPort awkwardly placed on the rear. (Whew!)

powerspec laptop 7

Ports of the left edge of the PowerSpec 1710.

Ports are handled differently on the larger PowerSpec 1710. You (thankfully) don’t find any connections on the rear. On the left edge, there’s power, HDMI, a pair of Mini-DisplayPorts, a pair of USB 3.1 ports, and a single USB 3.1 Type-C connection complete with Thunderbolt 3 support. The right edge packs another pair of USB 3.1 ports, SD card and Kensington lock slots, ethernet, and mic/headphone/line out jacks.

powerspec laptop 15

The PowerSpec 1710 (left) is thinner than the PowerSpec 1510 (right). 

The 17.3-inch laptop naturally measures in a bit wider and longer than its smaller cousin, at 16.5 x 11.5 inches. Despite that it appears sleeker to my eye due to being one inch thick—a quarter-inch thinner than the PowerSpec 1510. The decision to reduce the height may not have been a smart one, though. The PowerSpec 1710 suffers from reduced performance during extended usage, while the PowerSpec 1510 doesn’t. We’ll cover that in detail during the performance section.

powerspec laptop 8

The PowerSpec 1710’s rear exhaust is red, inexplicably. 

The angular rear exhausts on the PowerSpec 1710 are painted an obnoxious “gamer red” color that coordinates with a pair of red RGB lights on either side of the triangular power button found front and center underneath the display. The PowerSpec 1510 sticks to black aluminum throughout, augmented by blue lighting under its keyboard and a more subdued rectangular power button. That better fits my personal tastes, though both laptops include software that let you customize the keyboard’s RGB backlighting by region.

powerspec laptop 13

Both PowerSpec laptops sport standard-issue Clevo keyboards. They’re as eh, okay as ever. I prefer the deeper key travel of the PowerSpec 1510; the shallower keys of the PowerSpec 1710 bottom out more frequently and feel less comfortable. The touchpads prove smooth and accurate, though the buttons are a bit too mushy—another common Clevo complaint. The PowerSpec 1510 embeds a fingerprint reader between those buttons, while the PowerSpec 1710 lacks any biometric support.

powerspec laptop 12

The PowerSpec 1510’s touchpad includes a fingerprint reader.

Audio differs between the two laptops as well. SoundBlaster handles the PowerSpec 1710’s audio, and the results are decent. The laptop gets nice and loud, but kind of blare-y at high volume. The audio can also sound curiously flat sometimes, though it’s clear overall and has a decent bass punch. The PowerSpec 1510 also packs SoundBlaster tech, but it’s bolstered by an ESS Sabre HiFi DAC and Texas Instruments Burr-Brown Audio. It sounds surprisingly good, with crisp, clear tones. Deep bass adds a warm feel. But the maximum volume is also surprisingly quiet—you won’t be cranking this notebook to 11. As ever, we recommend buying a nice gaming headset to pair with your gaming laptop.

PowerSpec laptop performance

The $1,300 PowerSpec 1510 and $1,400 PowerSpec 1710 deliver a hell of a lot of bang for your buck, be it in gaming, content creation, or whatever. Finding laptops packing this level of hardware for under $1,500 is almost impossible, especially with G-Sync (eventually) included. The similarly spec’d Alienware 15 R3 costs $2,000 on Amazon, for example, though its 1080p display refreshes twice as often. Hell, laptops with a less capable GTX 1060 sometimes cost more than these Micro Center machines.

Let’s take them to the test bench.

ps cinebench

Maxon’s Cinebench R15 measures raw CPU performance, and the more threads you can throw at it, the happier it is. Many of today’s high-end gaming laptops lean on the same Intel Core i7-7700HQ, and thus deliver similar results with some minor variations due to cooling design differences. Only the beastly Alienware 17 ($2,599 as configured on Dell) edges ahead of the crowd thanks to its more powerful Core i7-7820HK CPU.

ps handbrake

Deeper differences between the design of the PowerSpec 1510 and PowerSpec 1710 became obvious in our next test, which mostly focuses on CPU performance as well. The Cinebench test has a short run time, but the file we encode in our HandBrake test (which uses an older version of the software) takes around 45 minutes on a quad-core processor. The extended duration reveals how a laptop’s temperature throttling affects performance over time.

The thicker PowerSpec 1510 delivers the best scores among the legion of Core i7-7700HQ laptops; the PowerSpec 1710 clocks in 52 seconds slower. Sure, that’s only a minute or so’s difference between the two in reality, but we’ll also see endurance concerns during gaming benchmarks that stress both the CPU and the GPU.

ps 3dmfs

Speaking of which, graphics are the star of the show in gaming laptops. We test the visual chops of gaming laptops using 3DMark’s Fire Strike Extreme benchmark. Specifically, we rely on the Graphics sub-score, which focuses on pure GPU performance. The overall score takes more hardware factors into account and is less useful for our needs.

Here you see the might of the fully enabled GeForce GTX 1070. The PowerSpec laptops turn in graphics scores close to the similarly equipped $2,000 Alienware 15 R3’s. But Micro Center’s laptops thoroughly trounce rival notebooks packing Nvidia’s new GTX 1070 Max-Q chip for a fraction of the cost, like the $2,199 Gigabyte Aero 15X and $2,375 Origin EVO15-S. Max-Q enables more powerful GPUs to squeeze into thin and light frames, but need to be severely underclocked to achieve that portability. In fact, the unleashed GTX 1070 inside the PowerSpec 1510 and 1710 are only a hair slower than the GTX 1080 Max-Q found inside the Asus ROG Zephyrus—a premium Max-Q flagship that, at $2,700, costs nearly double that of Micro Center’s machines.

That trend continues when it comes to actual gaming benchmarks.

ps tomb raiderps rotrps mordor

Note that the PowerSpec 1510 comes in slightly ahead of the PowerSpec 1710 across the board—that’s the difference in design and thermal throttling coming into play. Like Cinebench, gaming benchmarks tend to be pretty short, so I repeatedly run the Rise of the Tomb Raider benchmark for an hour, noting the differences in frame rate from the first to the last run. The PowerSpec 1510 delivered essentially the same experience throughout, with frame rate fluctuations inside of 1 frame per second. But the extended test hammered the larger PowerSpec 1710. It started off hitting 97.42 fps in the game; after an hour, it hit 92.31. That’s a 5-percent performance hit under extended load—not something you see very often.

The PowerSpec 1510’s fans aren’t overly quiet when the laptop’s under load, but they aren’t overly loud either. That’s about the best you can ask for in a gaming laptop. On the other hand, the PowerSpec 1710’s fans are much more audible, and emit an annoying high-pitched whir. You can’t hear either with gaming headsets on, but the barista at Starbucks would like you a lot more if you left the PowerSpec 1710 at home.

ps battery

We test battery life by looping a 4K video in Windows 10’s built-in Movies & TV video player, with the display brightness set to 250 to 260 nits—that’s bright enough to watch comfortably in an office environment.

In the stock configuration, with Microsoft Hybrid Graphics enabled, the battery life is actually pretty darn decent for a gaming laptop. The PowerSpec 1710 and its nearly 67 watt-hour battery lasts 264 minutes (4 hours, 24 minutes), around 39 minutes longer than the PowerSpec 1510, which has a smaller 60Whr charge.

Activating the discrete graphics to get G-Sync up and running devastates the endurance of Micro Center’s laptops, as you’d expect. With the GTX 1070 running constantly, the PowerSpec 1510 taps out at 151 minutes (2 hours, 31 minutes), 97 minutes sooner than it did with Hybrid Graphics enabled. The PowerSpec 1710 dies at 128 minutes (2 hours, 8 minutes), a whopping 113 minutes—nearly two full hours—sooner than before.

Those are among the worst results we’ve seen in a gaming laptop. If you plan to be out on the road for the day and don’t want to drag your charger along with you, consider switching back over to Hybrid Graphics.

Should you buy the PowerSpec 1510 and 1710?

Micro Center’s $1,300 PowerSpec 1510 and $1,400PowerSpec 1710 deliver a staggering amount of bang for your buck. Laptops with beefy hardware loadouts like this typically cost several hundreds more, and often cross the $2,000 range. Seriously: These are both damned, damned good deals if you want a powerful gaming notebook without breaking the bank. The exceptional displays and aluminum exteriors are just desserts after the hardware buffet.

powerspec laptop 10

The PowerSpec 1510 is the better buy.

The low cost comes at a price, though. These are prototypical big, heavy gaming laptops. The decision to ship them with a flagship feature like G-Sync disabled and hidden away behind arcane BIOS menus is downright perplexing, even taking G-Sync’s battery life hit into account. The PowerSpec 1710 also suffers from an annoying fan, more overtly aggressive “gamer” aesthetics, and a thermal profile that can result in noticeable performance degradation during extended use.

On the whole, the PowerSpec 1510 delivers a more well-rounded experience with no serious flaws. I’d heartily recommend it over the PowerSpec 1710 even if you tend to lean towards larger screen sizes. But both of these are downright steals if you live near a Micro Center and are able to pick one up. $1,300 for all this is ridiculous. There’s no GTX 1070-equipped laptop we can even point to as a rival in this price range. If you wanted to get this level of power in a thin sub-five-pound laptop, you’d need to step up to a GTX 1080 Max-Q machine like the Asus ROG Zephyrus, which costs $2,700—more than twice the price of Micro Center’s chubby, cheap offerings.

Just be sure to enable G-Sync for the best gaming experience—and maybe disable it again if you wander away from your charger.

(pcworld.com, https://goo.gl/Xhv5ip)

ASUS ROG GL702VS vs ASUS ROG GL702VM – what are the differences?

$
0
0

This article is dedicated to the differences between two great gaming solutions by ASUS – we are talking about ASUS ROG GL702VS and ASUS ROG GL702VM.

For starters, the ASUS ROG GL702VS is powered by a 7th generation Intel Core i7-7700HQ CPU, while the GL702VM can be configured with 6th or 7th generation Intel Core processors. In addition, the former is equipped with NVIDIA GeForce GTX 1070 (8GB GDDR5) which is more powerful when compared to the NVIDIA GeForce GTX 1060 (6GB GDDR5) in ASUS ROG GL702VM. As for the memory capacity, both laptops come with up to 32GB of DDR4-2133 RAM.

Moving on to the display options, the two notebooks feature 17.3-inch Full HD (1920 x 1080) IPS panels but ASUS ROG GL702VS also sports a 17.3-inch 4K UHD (3840 x 2160) IPS one. In terms of overall dimensions, the ROG GL702VS is heavier and thicker than its rival – tipping the scale at 2.90 kg (6.4 lbs) with around 28-30 mm thickness compared to 22-24 mm and 2.70 kg (6 lbs).

And finally – there is no difference in the connectivity options.

Specs sheet

Series
  • ASUS ROG GL702VS
  • ASUS ROG GL702VM
OS
  • Windows 10
  • Windows 10
CPU
  • Intel Core i7-7700HQ
  • Intel Core i7-7700HQ
  • Intel Core i7-6700HQ
RAM
  • up to 32 GB of DDR4-2133 RAM
  • up to 32 GB of DDR4-2133 RAM
Internal storage
  • 2280 PCIe NVMe (M key)
  • M.2 PCIe NVMe SSD (2280)
GPU
  • NVIDIA GeForce GTX 1070 (8GB GDDR5)
  • NVIDIA GeForce GTX 1060 (6GB GDDR5)
Display
  • 17.3”, Full HD (1920 x 1080), IPS
  • 17.3”, 4K UHD (3840 x 2160), IPS
  • 17.3”, Full HD (1920 x 1080), IPS
Connectivity Wi-Fi 802.11ac, Bluetooth 4.1 Wi-Fi 802.11ac, Bluetooth 4.0
Features
  • 1x USB 3.1 Type-C
  • 3x USB 3.0 Type-A
  • HDMI
  • Displayport mini
  • Multi-format card reader
  • Audio jack
  • Security Lock slot
  • 1x USB 3.1 Type-C
  • 3x USB 3.0 Type-A
  • HDMI
  • Displayport mini
  • SD card reader
  • Audio jack
  • Security Lock slot
Battery
  • 76Wh, Li-Ion, 4-cell
  • 76Wh, Li-Ion, 4-cell
Weight 2.90 kg (6.4 lbs) 2.70 kg (6 lbs)

All ASUS ROG GL702VS configurations

ASUS ROG GL702VS – $1479.99
  • Intel Core i7-7700HQ
  • NVIDIA GeForce GTX 1070 (8GB GDDR5)
  • 1000GB HDD
  • 12GB RAM
ASUS ROG Strix GL702VS – $1498.99
  • Intel Core i7-7700HQ
  • NVIDIA GeForce GTX 1070 (8GB GDDR5)
  • 1000GB HDD + 128GB SSD
  • 12GB RAM
ASUS ROG GL702VS – $1649.00
  • Intel Core i7-7700HQ
  • NVIDIA GeForce GTX 1070 (8GB GDDR5)
  • 1000GB HDD
  • 12GB RAM

All ASUS ROG GL702VM configurations

ASUS ROG GL702VM – $1379.00
  • Intel Core i7-6700HQ
  • NVIDIA GeForce GTX 1060 (6GB GDDR5)
  • 1000GB HDD + 128GB SSD
  • 12GB RAM
ASUS ROG GL702VM – $1457.12
  • Intel Core i7-6700HQ
  • NVIDIA GeForce GTX 1060 (6GB GDDR5)
  • 1000GB HDD
  • 16GB RAM
ASUS ROG GL702VM (7th Gen Intel Core) – $1570.60
  • Intel Core i7-7700HQ
  • NVIDIA GeForce GTX 1060 (6GB GDDR5)
  • 1000GB HDD + 128GB SSD
  • 16GB RAM
(laptopmedia.com, https://goo.gl/2WdJxJ)

RDP Thinbook 1110 Review

$
0
0

Our Verdict

The RDP Thinbook 1110 is definitely cheap, but that’s about the only thing working in its favour. It offers poor performance and is largely unusable.

PROS

  • Affordable
  • Workable port selection

CONS

  • Annoying touchpad
  • Bad Performer
  • sub-par build quality
  • Average battery life

RDP Thinbook 1110: Detailed Review

At Digit, we get a lot queries for laptop recommendations under Rs. 20,000. While there are plenty of machines in this range, it’s tough to recommend any of them. Sometimes the display is not good enough, while performance just won’t cut it in some. To be fair, a sub-15K laptop leaves little room for decent (or powerful) specifications. Still, with growing demand and steady drop in hardware prices, the Indian laptop market now offers various options in the sub-15K segment. One such laptop is the RDP Thinbook 1110. It has an MRP of around Rs. 18,000, but is currently available at Rs. 13,999. Let’s take a look at what it offers.

Specifications

Processor: Intel Atom x5-Z8350U
RAM: 2GB
Storage: 32GB
Display: 11.6-inch, 1366 x 768p
Battery rating: 8000mAh
Warranty: 1 year

Build and Design

The RDP Thinkbook 1110 is not a very expensive laptop and it shows right away. It is made out of plastic and not a very good one at that. All panels on the body have varying degrees of flex, with the exception of the display. The display does not have any discernible flex since it is a touchscreen unit and features a glass touch panel. This also means that the unit is a little top heavy and the base lifts up from the desk as soon as the display is tilted beyond 120 degrees. That’s a problem because that makes whole rock up and down once you lift your hands from the keyboard.

It uses a two part hinge mechanism, which works but is a dated design and definitely different from what the company advertises on its website. Also, unlike many other mainstream convertibles, the Thinbook 1110 does not automatically turn off the keyboard and touchpad in tablet mode. Hence, you get a dedicated physical toggle to turn off the keyboard and touchpad.

All this seems rather unconvincing for any and all plausible buyers, even when you consider the ultra-affordable price, which is now easily matched by many of its peers, like Acer Switch one and Micromax Canvas Laptab.

Display and ports

If you go by the images on the company’s website, the display on the Thinbook 1110 should have thin bezels, but in reality that isn’t the case. The display has thick bezels all around and the display quality can only be called sub-par. The colour fidelity of the 11.6-inch laptop is bad and it has very limited viewing angles. This becomes quite apparent once you use the laptop in portrait mode as a tablet. In portrait mode, the display puts a lot of strain on your eyes and we would advise against using it in that mode, even if you end up buying this laptop.

Since it is also a touch-sensitive display, you can use it to browse the web or in various other “convertible” positions. While touch response is reasonable, it is the unusable performance of the machine that lets you down, but more on that later.

RDP has however given some thought to the port selection. The machine offers a USB 2.0 port on the left side, along with a headphone and microphone combo. The right side of the laptop has a microSD card slot, micro HDMI port and surprisingly a USB 3.0 port.

Keyboard and Touchpad

The keyboard on the machine is just average and can be considered at par with most sub-15K laptops out there. The keys on the chiclet style keyboard offer uneven travel distance and aren’t very precise. The keys are also smaller than a regular style keyboard and may get some time to get used to. This could be a major issue for touch typists, though we doubt touch typists will be looking at this laptop. The keyboard is also devoid of some major shortcut buttons. There is no brightness toggle on the keyboard itself. In its place, it has a dedicated settings shortcut, which seems unnecessary.

Below the keyboard, there is a small touchpad which does not track well, has no palm rejection and gets activated at times when it is not even in use. As for gestures, those are also not supported and robs users from navigating Windows 10 quickly. In our week long testing period, the two finger scroll worked just once. As for the left and right keys, they work well, but have a short click and inadequate feedback, which is disappointing, even at its price

Performance

While the specification sheet seems like a list of compromises made to meet the budget, the performance of the machine is by far the worst we have seen this year. 2GB of RAM is too low to run even the 32-bit Windows OS and at ideal, with no active applications running, is 50 percent used. The situation worsens as soon as you start using the Chrome browser. In our tests, the quad-core Intel Atom processors hit its limit with just five tabs open on Chrome. Needless to say, that 2GB of RAM was also running at full capacity, making the machine extremely sluggish. You can get away with more open tabs on Microsoft’s Edge browser, but even then the laptop starts to slow down.

Using the laptop in the tablet form factor is a similar pain. That being said, you can stream content up to 1080p on the laptop, which is played with some stutters. Streaming video content in 720p is not an issue unless you have other tabs open in your browser. The touch response seems inadequate because of the slow processor and you end up tapping a menu or shortcut multiple times before it opens.

As for storage, you get 32GB eMMC memory at your disposal, which is one third full when you’re pulling this laptop out of the box. That leaves little space for any other applications you might want to install, including essentials like Microsoft Word.

Battery life

The only good thing on the RDP Thinbook 1110 is its battery life, which with a 2W (SDP) processor and a small touchscreen, goes on for about five-six hours with its limited performance. That being said, it is still average performance compared to what we have seen thus far. The 30.4Whr battery is literally taped onto the chassis, and takes a long time to charge with the supplied 5W charger. You will also have to sit really close to the power outlet once the system is in charging, as the cable is just 4 feet long compared to a normal 8-10 feet charging cable available with most laptops today.

Bottomline

The RDP Thinbook 1110 then is a laptop you shouldn’t buy even if you are on a low budget. Its performance is difficult to cope with, the build quality and touchpad have annoying issues, the keyboard is average and so is the battery life. The convertible function is also rather stunted due to the sub-par viewing angles of the display. The only aspect where we feel the laptop comes at par with its peers is the port selection, but that doesn’t change the fact that the RDP Thinbook is a poorly executed laptop.

(digit.in, https://goo.gl/mYzoLB)

Acer Nitro 5 Spin Review

$
0
0

Our Verdict

The Acer Nitro 5 Spin is a good overall laptop, but is not suited for gaming or heavy duty tasks.

PROS

  • Well built
  • Relatively lightweight
  • Good keyboard

CONS

  • GPU Bottleneck
  • Heating issue
  • Display could have been better

Acer Nitro 5 Spin: Detailed Review

I am a fan of both ultrabooks and gaming laptops. And I get to cover a lot of laptops at Digit, and these are the two categories that I truly believe can take the PC industry further. These machines push laptop OEMs to innovate and sometimes even re-invent the wheel, though that hasn’t happened in a while. Still, I believe thin and light will be the future and we are starting to see signs of that this year with powerful gaming laptops shedding weight being thinner. While this is in part due to decreasing thermal envelopes of PC components, a good thermal design also makes quite an impact. Amidst this, at IFA this year, Acer introduced the Nitro Spin 5. Powered by an 8th Intel Core i7 processor and featuring the GTX 1050, the Spin 5 is the first convertible gaming oriented laptop we have seen this year. Let’s take it for a spin (pun intended).

Specifications of our test machine
Display: 15.6-inch, 1920 x 1080p, touchscreen
CPU: Intel Core i7 8550U
RAM: 8GB
GPU: Nvidia GeForce GTX 1050 + Intel UHD 620
Storage: 256GB SSD + 1TB HDD

Build and Design
Unlike the Nitro 5 and the Helios 300 before it, the Nitro 5 Spin looks like a classier approach, from the outside. The company retained the red and black theme, albeit a muted version. A red trim runs around the edges and you get red hinges that give this machine its classy look. On the inside, you have a 1080p touchscreen panel and the keyboard has red backlighting, completing the “gamer” look. There is a red trim around the touchpad as well, that adds to the aesthetic values of the machine.

That’s not all. It is very well crafted and undoubtedly offers one of the best build quality I have seen on a laptop in this price segment and of this size and caliber. Both the front and back of the laptop are made out of metal. Same goes for the keyboard and they all add some heft to it, but the overall build quality makes up for that. In addition, there are no plastic bits sticking out, the vents are not orange (like many gaming laptops) and it is perfectly rectangular, like a laptop should. I like the whole simplistic appeal of this laptop, but looks are always a subjective matter.

Display and Ports

The Acer Nitro 5 Spin is a convertible laptop. You get a 15.6-inch IPS LCD display with 1080p resolution at your disposal, with touch support. It is not the best when it comes to colour fidelity, as the NTSC colour coverage is just 48%. But in the time I have spent with the machine, I didn’t find the experience lacking in any sense. Games look sharp enough and so do movies. The only issue I have with the display is that being a touchscreen, it uses a glossy panel. This makes it quite reflective in any lighting condition.

As for the ports on this machine, the suite is limited yet workable. On the left you have the proprietary barrel power jack, one HDMI port, one USB Type-C port with display support and two USB 3.0 Type-A ports. On the right, there is a USB 2.0 port and a SDXC car slot. The power button and volume rocker reside on the right side. Considering all use cases, the only thing which I believe is missing here is Thunderbolt 3.0 support.

Keyboard and Touchpad
Building upon what we have seen in recent times from Acer, the well-spaced island style keyboard on the Nitro 5 Spin is actually quite good for typing. The red and black keys offer decent travel and press down with an audible sound. This makes it one of the best laptop keyboards I have come across this year for touch typists. However, the smaller arrow keys are a blotch in the typing experience and Acer should address this. The keyboard has red backlighting, which is good, but using the laptop at night is nothing short of frustrating. The backlight can be turned on or off with the “F8” key, which means that you will end up pressing each key on the top row in order to find F8 in the night. The other thing is that when the computer restarts or comes back from sleep, the backlighting goes back to the default state, which is off.

As for the touchpad, it is quite plain. It tracks well, is smooth to touch and supports all gestures without any issues. The left and right click buttons are embedded on the touchpad itself and you need to press down lightly. It even has a faint yet audible click. Acer has also integrated a fingerprint scanner on the touchpad itself, which works with Windows Hello.

Performance

Things become interesting as soon as we talk about performance as this is the first time we are testing a machine running the 8th generation Intel Core i7-8550U. The newer U series CPU from the blue team now features two additional physical cores, which should take the performance beyond the 7th generation i7 quite easily. So, it wasn’t a surprise that this U series Intel chip posted some really intriguing scores against the likes of last year’s Intel Core i7-7500U and the more powerful Core i7-7700HQ.

The performance of the CPU and the laptop itself remains equally snappy through day-to-day applications, such as MS-Office, Chrome and Netflix. I even tried some Blu-ray content on the machine and it also ran fine. However, I was far more interested in testing the gaming claims made by Acer. Hence, I ran the normal suite of games I generally run on these laptops.

We started with less demanding games like Dota 2 and Bioshock, and to our astonishment the performance was rather dull. Even less demanding games such as Dota 2, which are easily playable at high settings even on integrated graphics, drops frames every now and then. The CPU and GPU combo was unable to go beyond 50fps at the highest settings in Dota 2. Moving to DOOM, which is a well optimised graphic intensive title returned a max fps of just 33 fps at the highest settings. So, like anyone would do in such a situation, I dropped graphics quality to its lowest settings and the average frame rate on DOOM increased by mere 3 frames per second.

Running more gaming benchmarks, it was quite obvious that the GTX 1050 is creating a bottleneck for the new Core i7-8550U. Some games are not affected by this mis-match of GPU and CPU, but games like DOOM and Battlefield 1 do justify our findings.

Then there is the heating issue, as the processor instantly reaches 75 degree celsius (on chip), throttling down the CPU to base clock speeds and sometimes running even lower. The twin fan cooling setup used by Acer here is rather inefficient as the all metal keyboard deck does get uncomfortably hot, reaching 48-50 degree celsius in some areas, including the “WASD” keys. The heat is less noticeable if you are sitting in an air conditioned room, but I wouldn’t recommend gaming on this machine without that.

The two shoulder mounted speakers fire towards the back are loud, but lack quality. Moreover, on our test unit, the right speaker started rattling after just half an hour of use. The only good thing is that in tent mode, the speakers are firing towards (or nearer) to you, which does make movie watching experience slightly better than its counterparts.

Battery

The powerful yet counter-intuitive hardware also burns battery pretty fast and in our PCmark 8 benchmark, the machine lasted for just 2 hours and 44 minutes. However, the screen on time varies from application to application, and also with brightness. If you are watching a movie at 50% brightness for instance, the laptop may last you less than four hours, which isn’t exactly bad for a gaming laptop. All-in-all, there is room for improvement, especially when Intel is claiming that the new Kaby Lake refresh is more power efficient.

Bottomline

Overall, I think the Acer Nitro 5 Spin is a good example of hardware mismatch. While the CPU is quite powerful and plays its part well for most regular tasks, the discrete GTX 1050 is not the right match for the new quad-core chip here. The Nitro 5 Spin is a good overall thin and light convertible, but should not be considered for gaming.

However, if you look past the janky gaming performance, Acer has done a superb job with build quality and looks of the device. The keyboard is one of the best I have encountered in its price segment, barring Thinkpads and though the battery life isn’t great, it meets industry standards today.

(digit.in, https://goo.gl/dP6EjE)

Acer Swift 5 (SF514-52) vs Acer Swift 5 (SF514-51) – what are the differences?

$
0
0

Usually, after we preview one laptop we then compare it to its predecessor so you can take a glimpse at the major differences and decide for yourself whether the upgrade is needed. This is exactly what we are going to do with Acer Swift 5 (SF514-52) and Acer Swift 5 (SF514-51) in today’s article.

For starters, Acer Swift 5 (SF514-52) can be configured with up to 8th generation Intel Core processors that are more powerful but have the same energy consumption as the 7th generation ones which can be found in the previous model. In addition, the former accommodates an Intel UHD Graphics 620 GPU, while the latter – Intel HD Graphics 620. Quite expectedly, the SF514-52 model comes with up to 16 GB of DDR4-2400 RAM compared to up to 8GB of DDR4-2133 RAM in the SF514-51.

Additionally, both devices feature 14-inch IPS panels with Full HD (1920 x 1080) resolution. However, there is a noticeable difference in the weight – Acer Swift 5 (SF514-52) is lighter than its predecessor – 0.97 kg (2.1 lbs) vs 1.30 kg (2.9 lbs). Furthermore, the notebooks are made of different materials as the newer model sports magnesium-lithium top and bottom and magnesium-aluminum palm rest area which makes it extremely portable but also stable, while the previous one – aluminum and plastic.

And finally – the difference in the connectivity options hides in the USB Type-A ports – Acer Swift 5 (SF514-52) features two USB 3.0 Type-A ports that provide faster data transfer compared to the 2.0 ones in its predecessor.

Specs sheet

Series
  • Acer Swift 5 (SF514-52)
  •  Acer Swift 5 (SF514-51)
OS
  • Windows 10
  • Windows 10
CPU
  • Intel Core i7-8550U
  • Intel Core i5-8250U
  • Intel Core i7-7500U
  • Intel Core i5-7200U
RAM
  • up to 16 GB of DDR4-2400 RAM
  • up to 8 GB of DDR4-2133 RAM
Internal storage
  • 2280 PCIe NVMe M.2 slot
  • 2280 PCIe NVMe (M key)
GPU
  • Intel UHD Graphics 620
  • Intel HD Graphics 620
Display 14.0”, Full HD (1920 x 1080), IPS 14.0”, Full HD (1920 x 1080), IPS
Connectivity Wi-Fi 802.11ac (2×2), Bluetooth 4.1 802.11ac, Bluetooth 4.0
Features
  • 1x USB 3.0 Type-A (Sleep and Charge)
  • 1x USB 3.0 Type-A
  • 1x USB 3.0 Type-C
  • HDMI
  • SD card reader
  • audio jack
  • Security Lock slot
  • 2x USB 2.0 Type-A
  • 1x USB 3.0 Type-C
  • HDMI
  • SD card reader
  • combo audio jack
  • Security Lock slot
Battery
  • 4670 mAh, 2-cell
  • 4670 mAh, 3-cell
Weight 0.97 kg (2.1 lbs) 1.30 kg (2.9 lbs)

All Acer Swift 5 (SF514-52) configurations

Acer Swift 5
  • Intel Core i5-8250U
  • Intel UHD Graphics 620
  • 256GB SSD
  • 8GB RAM
Acer Swift 5
  • Intel Core i7-8550U
  • Intel UHD Graphics 620
  • 512GB SSD
  • 16GB RAM

All Acer Swift 5 (SF514-51) configurations

Acer Swift 5 – $736.99
  • Intel Core i5-7200U
  • Intel HD Graphics 620
  • 256GB SSD
  • 8GB RAM
Acer Swift 5 (SF514-51) – $736.99
  • Intel Core i5-7200U
  • Intel HD Graphics 620
  • 256GB SSD
  • 8GB RAM
Acer Swift 5 – $829.99
  • Intel Core i7-7500U
  • Intel HD Graphics 620
  • -GB HDD + 256GB SSD
  • 8GB RAM

(laptopmedia.com, https://goo.gl/Jc4Joo)

ASUS VivoBook F510UA (X510) vs ASUS VivoBook S15 (S510) – what are the differences?

$
0
0

After we acquainted you with the key features of the new ASUS VivoBook F510UA (X510), it is now time to compare the device to ASUS VivoBook S15 (S510) and find out what the major differences are.

In terms of hardware, ASUS VivoBook F510 (X510) is powered by up to an 8th generation Intel Core i7-8550U processor providing more than enough power and great performance, while its rival accommodates up to a 7th generation Intel Core i7-7500U one. As for the graphics card, the F510UA offers two options – NVIDIA GeForce 940MX (2GB GDDR5) and Intel UHD Graphics 620 compared to Intel HD Graphics 620 in the S15. However, ASUS VivoBook S15 (S510) comes with a larger maximum amount of memory – up to 32GB of DDR4-2133 RAM vs up to 16 GB of DDR4-2400 RAM for F510UA.

In terms of display options, both devices feature a 15.6-inch diagonal with Full HD (1920 x 1080) IPS panel but ASUS VivoBook F510UA also sports an HD (1366 x 768) TN one. There is also a difference in the thickness of the devices – 19.4 mm vs 17.9 mm in favor of S15 (S510). In addition, ASUS VivoBook F510UA (X510) is made of plastic and polycarbonate, while its competitor is fully metal. And finally – the connectivity options are identical.

Specs sheet

Series
  • ASUS VivoBook F510UA (X510)
  • ASUS VivoBook S15 (S510)
OS
  • Windows 10
  • Windows 10
CPU
  • Intel Core i7-7500U
  • Intel Core i5-8250U
  • Intel Core i7-8550U
  • Intel Core i7-7500U
  • Intel Core i3-7100U
RAM
  • up to 16 GB of DDR4-2400 RAM
  • up to 32GB of DDR4-2133 RAM
Internal storage
  • 2280 PCIe NVMe slot
  • HDD/SSD
GPU
  • NVIDIA GeForce 940MX (2GB GDDR5)
  • Intel UHD Graphics 620
  • Intel HD Graphics 620
Display
  • 15.6”, Full HD (1920 x 1080), IPS
  • 15.6”, HD (1366 x 768), TN
  • 15.6”, Full HD (1920 x 1080), IPS
Connectivity Wi-Fi 802.11ac, Bluetooth 802.11ac, Bluetooth 4.1
Features
  • 2x USB 2.0 Type-A
  • 1x USB 3.0 Type-A
  • 1x USB 3.1 Type-C
  • HDMI
  • SD card reader
  • audio jack
  • 2x USB 2.0 Type-A
  • 1x USB 3.0 Type-A
  • 1x USB 3.0 Type-C
  • HDMI
  • SD card reader
  • audio jack
Battery
  • 42Wh, Li-ion, 3-cell
  • 42Wh, Li-ion, 3-cell
Weight 1.70 kg (3.7 lbs) 1.70 kg (3.7 lbs)

All ASUS VivoBook F510UA (X510) configurations

ASUS VivoBook F510UA – $499.00
  • Intel Core i5-8250U
  • Intel UHD Graphics 620
  • 1000GB HDD
  • 8GB RAM
ASUS VivoBook 15 (X510UQ) – $679.00
  • Intel Core i7-7500U
  • NVIDIA GeForce 940MX (2GB GDDR5)
  • 1000GB HDD
  • 8GB RAM
ASUS VivoBook F510 – $919.99
  • Intel Core i5-8250U
  • Intel UHD Graphics 620
  • 1000GB HDD + 128GB SSD
  • 8GB RAM

All ASUS VivoBook S15 (S510) configurations

ASUS VivoBook S15 S510 – $577.69
  • Intel Core i3-7100U
  • Intel HD Graphics 620
  • 1000GB HDD
  • 6GB RAM
ASUS VivoBook S15 – $819.00
  • Intel Core i7-7500U
  • Intel HD Graphics 620
  • 1000GB HDD + 128GB SSD
  • 8GB RAM
ASUS VivoBook S15 – $899.99
  • Intel Core i7-7500U
  • NVIDIA GeForce 940MX (2GB DDR3)
  • 1000GB HDD
  • 16GB RAM

(laptopmedia.com, https://goo.gl/xkeHK8)


10 killer PC upgrades that are shockingly cheap

$
0
0

Looking to put more pep in your PC’s step? These surprisingly cheap PC upgrades and accessories do the trick without breaking the bank.

credit card

No need to break the bank

Sure, swanky new Surface Pros and $1,200 graphics cards may capture all the headlines, but on a practical level, the real story is that PCs aren’t cheap. As a working father with two kids and a mortgage to pay, I understand that all too well. But if your computer’s starting to feel pokey, there’s fortunately no reason to rush out a spend hundreds on a new one.

Investing small amounts in key new PC hardware can keep your computer running strong for years to come. These upgrades—most costing well under $100—breathe new life into slow machines. You just have to be strategic and make sure you’re putting your money in the best place for your particular system.

Editor’s note: This article was last updated December 18, 2017 with current hardware and pricing information.

ssds


  • Samsung 850 EVO – 250GB – $89.99 MSRP $150.00
  • Crucial BX300 120GB SATA – $59.99 MSRP $59.99

Speed up your PC with an SSD

Let’s start in the most obvious place. If your PC still runs with a mechanical hard drive, swapping it out with an SSD will make it feel like a whole new computer. SSDs inject face-melting speed into a PC, drastically improving boot times, file transfers, and overall system responsiveness.

Even with prices having risen slightly in the past year, a solid-state drive is still affordable. Superb models like the Samsung 850 EVO ($90 for 250GB on Amazon) and the Crucial BX300 ($60 for 120GB on Amazon) can be found for well under $100 online. If you find the storage capacities a bit too tight, you can always install the SSD as a boot drive alongside your current hard drive.

A word of warning about SSDs, and all the hardware discussed in this article: You can often find lower prices if you sift through Amazon or Newegg for no-name or lesser-known brands. But you’re gambling on reliability and support when you move away from established PC hardware makers. Stick with name brand gear unless you absolutely, positively can’t afford it.

wd blue 1tb hard drive
  • Western Digital WD Blue 1TB SATA 6 Gb/s 7200 RPM 64MB… – $49.00
  • Western Digital WD Blue 3TB Desktop Hard Disk Drive -… – $89.95
  • Seagate Firecuda Gaming 1TB 5400RPM 2.5-Inch SSHD… – $62.99 MSRP $62.99
  • FireCuda Gaming 1TB 7200RPM 3.5-Inch SSHD (ST1000DX002) – $75.99 MSRP $75.99

Mass storage is dirt cheap

Good news if your available storage space is filled to the brim: Traditional hard drives are pretty cheap right now. A 1TB Western Digital Blue hard drive spinning at a speedy 7,200rpm will only set you back $50 on Amazon, while a 3TB WD Blue drive is just $90 on Amazon (albeit at a slower 5,400rpm).

Hybrid drives blend the best of both worlds, combining a large amount of traditional storage with a small, speedy flash storage cache. The drive monitors your oft-used files and keeps them on the cache, where they benefit from SSD-esque speeds. A Seagate 2.5-inch, 5,400rpm 1TB hybrid drive with an 8GB SSD cache goes for $65 on Amazon, while a 3.5-inch, 7,200rpm 1TB model with an 8GB SSD cache can be had for $76 on Amazon.

PCWorld’s guide to SSDs, hard drives, and hybrid drives dives into greater detail about each type of storage. Don’t forget to back up your databefore swapping out any storage drives!

corsair vengeance ddr4 ram

  • Kingston HyperX Fury 8GB Kit (2x4GB) 2133MHz DDR4… – MSRP $94.99
  • Corsair Vengeance Blue 8GB (2X4GB) DDR3/1600mHz Memory… – $69.99

Add RAM for more multitasking

If your computer’s having trouble running multiple tasks simultaneously, low memory is a likely culprit. Two gigabytes of RAM is the absolute minimum modern Windows systems need to run smoothly, and even PCs with 4GB of memory can start to feel pokey if you’re running several programs, keep a dozen Chrome tabs open, or game with some background processes still running.

Unfortunately, memory’s no longer dirt cheap. Still, if you keep an eye out for sales, you can get 8GB of DDR4 RAM for about $75 and 8GB of DDR3 RAM for about $70. Stick to reliable brands like Kingston and Corsair, even if you’re tempted to save pennies by going with a no-name company.

Be sure to get the right type of memory for your PC: RAM comes in all sorts of different packages. The easiest way to tell what type of RAM resides in your PC is to download the free, superb CPU-Z software, then open the Memory tab and look for the “type” option.

amd apu


  • AMD Athlon X4 860K Black Edition CPU Quad Core FM2+… – MSRP $76.29
  • AMD FD832EWMHKBOX FX-8320E FX-Series 8-Core Black… – $104.90
  • AMD Black Edition A10-Series APU Processors with… – $96.88

MAYBE upgrade your CPU

A pokey PC may be the result of an outdated processor. Unfortunately, replacing your CPU often means replacing your motherboard too, making the endeavor pretty pricey. But not always—especially if you have an AMD-powered system.

AMD’s AM3+ and FM2 motherboards have been powering AMD’s CPUs and APUs, respectively, since mid-2012. Since many prebuilt AMD systems sport modest processors, upgrading to a modern CPU can give your PC a shot in the arm. If you’re on FM3+, the new Athlon X4 860K ($77 on Amazon) is a solid entry-level quad-core processor for gaming, while the 8-core FX-8320E ($107 on Amazon) is a great step-up option and price-to-performance champion. If you have an FM2-based system with an AMD APU, the A10-7860K ($97 on Amazon) could be a solid upgrade, complete with integrated graphics that let you get into e-sports games at modest frame rates.

Intel switches out its motherboards and socket types much more often, and its chips tend to be much more expensive. Replacing Intel chips aren’t really an affordable upgrade in most cases.

It’s important to make sure your new chip is compatible with your existing motherboard! Before you buy, fire up CPU-Z and search for the “Package” entry in the main CPU tab to see what sort of socket your motherboard packs.

xfx radeon rx 460

  • MSI GeForce GTX 1050 – MSRP $109.99

Gaming doesn’t have to be expensive

Want to dip your toes into PC gaming? Despite what fearmongers may tell you, gaming doesn’t have to cost an arm and a leg.

Nvidia’s GeForce GTX 1050 ($120 and up on Amazon) delivers great performance in e-sports games like League of Legends and Overwatch. It also lets you play modern games at a console-esque 30 frames per second with Ultra graphics settings at 1080p, or up to 60fps at Medium settings. Even better: Many models pull their power directly from your motherboard, with no need for additional power connectors. You can use this Nvidia card for adding gaming capabilities to prebuilt “big box” PCs from the likes of HP and Dell, as they often pack modest power supplies that lack extra connectors.

Be careful while you shop, though, as some overclocked models of the GTX 1050 require an extra six-pin power connector. You don’t want that if you don’t have one available—unless you want to buy a power supply, too. A 500 watt power supply from a reputable company doesn’t cost much, as evidenced by the EVGA 500 W1, which only costs $38 on Amazon.

clean pc canned dust

  • Dust-Off Compressed Gas Duster (4 pack) – $16.22 MSRP $16.22

Buy some canned air

No, seriously. If you haven’t cleaned out your PC in a year or more, mounds of dust and debris can be collected inside. Clogged fans and exhaust ports lead to overheating, which leads to your PC throttling back performance. Single containers of canned air can be relatively pricey; grab a four pack ($17 on Amazon) for a lower price and enough air to clean out your PC for years to come.

New to the idea? Check out PCWorld’s guide to PC cleaning before cracking open your case.

cpu paste

  • Arctic Silver 5 thermal paste (3.5g) – $7.49 MSRP $7.49
  • Cooler Master SickleFlow 120 – Sleeve Bearing 120mm… – $8.81 MSRP $9.99
  • NZXT Technologies FN V2 120mm Performance Case Fan… – $8.99 MSRP $8.99

Improve your cooling, improve your performance

If your PC’s still running hot after blowing out the dust, the thermal paste coating the area where your CPU or GPU touches its cooler could be old, dry, and ineffective, especially if you’ve had the equipment for several years.

First, install SpeedFan and double check that your CPU or GPU is indeed overheating. If one (or both!) is, grab a syringe of thermal paste—I adore Arctic Silver 5 ($7.50 on Amazon)—then use PCWorld’s guides to installing a CPU cooler and refreshing your graphics card to help you apply new thermal paste after scraping off the old stuff.

Still running hot overall? Try adding a case fan or two. Case fans from reputable vendors are shockingly cheap ($8.50 from Cooler Master on Amazon, or $9 from NZXT on Amazon) and can be installed in mere minutes.

acer r271h monitor

  • HP Pavilion 21.5-Inch IPS LED HDMI VGA Monitor – $89.99 MSRP $119.99
  • ViewSonic VX2257-MHD 22-inch 1080p FreeSync Gaming… – $119.99 MSRP $149.99

A better monitor

You spend most of your time interacting with your computer’s input and output devices, so it’s definitely worth investing in decent peripherals if you spend considerable time at your PC.

Start with your monitor. If you’re still using a lower-resolution display or (shudder) a fat CRT display, embracing a high-definition 1080p monitor will provide a huge step up in usability. It won’t break the bank either: You can buy a 1080p HP with a 21.5-inch IPS screen for just $90 on Amazon. IPS screens provide a much more vibrant image than the twisted-nematic panels found in most budget monitors.

Alternatively, if you’re a gamer with a Radeon graphics card, consider buying a monitor that supports AMD’s FreeSync technology. FreeSync synchronizes the refresh rate of your graphics card and display to eliminate stutter and screen tearing in games. While monitors with Nvidia’s competing G-Sync technology fetch steep price premiums, FreeSync adds minimal cost to a display. A 22-inch 1080p FreeSync display by ViewSonic costs just $120 on Amazon, for example.

gaming headsets

  • Kingston HyperX Cloud – MSRP $80.00
  • Sennheiser HD 280 Pro Headphones – $99.95 MSRP $99.95

Aural bliss

Treat your ears, too. The speakers that come bundled with prebuilt PCs tend to be utter garbage. While audio gear pricing can escalate to frightening levels, some of our favorite headsets will set you back less than a Benjamin.

If you’re a gamer, our favorite all-around gaming headset is the Kingston HyperX Cloud ($80 at Best Buy). The sound quality is second to none in this bracket, the build quality is superb, and it’s extremely comfortable—though its microphone is merely average.

Don’t need a mic? Music lovers will find a lot to love in the Sennheiser HD 280 Pro ($99.95 on Amazon), which I’ve personally been using for years now. The comfortably snug cans lack the extreme bass kick of, say, Beats or Monster headphones, but make up for it by delivering rich, accurate, and dynamic audio across the full sound spectrum. They’re beloved among Amazon buyers for a reason.

razer deathadder

  • Razer DeathAdder Ergonomic PC Gaming Mouse – $58.98
  • Logitech G610 Orion Spectrum – $59.99 MSRP $119.99
  • Logitech G610 Orion Brown Backlit Mechanical Gaming… – $59.99 MSRP $119.99

Enhance the parts you physically touch

If you’re used to crappy bundled PC keyboards, or laptop keyboards, upgrading to a mechanical keyboard will change your life. The well-reviewed Logitech G610 Orion with Cherry MX Red switches only costs $85 on Amazon. (The Cherry MX Brown version is $96.) That’s probably more than most people have spent on a keyboard before, but it’s cheap by mechanical standards. Once you’ve tried it, you won’t be able to go back to a rubber-dome board.

Likewise, investing in a decent mouse makes interacting with your PC that much more pleasant. The Razer DeathAdder ($57 on Amazon) is ostensibly a gaming mouse, but its ergonomic design and high DPI sensor help it feel good in your palm and generate nice, smooth cursor movements. I’ve been using one for more than five years now, and grimace whenever I’m forced to use a cheap mouse bundled with a prebuilt PC.

old pc parts

But first…

Speeding up your well-loved PC doesn’t actually have to cost any money. In fact, before you buy new hardware, take a peek at PCWorld’s guide to 10 cheap or free ways to make your old PC run faster. You’ll find a few tips repeated from here—seriously, buy an SSD—but for the most part, it focuses on no-cost software solutions for potentially boosting your computer’s performance. Try those before dropping dough on new gear!

If you do wind up upgrading some of your PC’s innards, however, PCWorld’s guide to building a PC can help you with step-by-step instructions on how to install each new component. Or if you’re looking to bolster a laptop, our guides to installing hard drives and memory in laptops can help you through the basics of the process.

(pcworld.com, https://goo.gl/pGBG6V)

Acer Nitro 5 vs Acer Aspire VX 15 (VX5-591G) – what are the differences?

$
0
0

We have already posted detailed reviews of the two premium notebooks Acer Nitro 5 and Acer Aspire VX 15 (VX5-591G), however, we thought you would be interested to find out how they differ from each other if you are hesitating between these two options.

Starting off with hardware, both laptops are powered by up to 7th generation Intel Core processors but Acer Nitro 5 also comes with AMD FX-9830P. In addition, while the two of them sport NVIDIA GeForce GTX 1050 Ti (4GB GDDR5) and NVIDIA GeForce GTX 1050 (4GB GDDR5) GPUs, Acer Nitro 5 once again features one more option – namely AMD Radeon RX 550 (Laptop) (4GB GDDR5). However, there is no difference in terms of memory capacity – up to 16GB of DDR4-2133 RAM.

As for display options, a 15.6-inch Full HD (1920 x 1080) IPS panel is the similarity between the two laptops but Acer Aspire VX 15 (VX5-591G) also accommodates a 15.6-inch Full HD (1920 x 1080) TNone. In addition, the differences in the overall dimensions are minor as Acer Nitro 5 is just 1 mm thinner and 20 grams lighter than its rival – 27 mm and 2.48 kg (5.5 lbs) vs 28 mm and 2.50 kg (5.5 lbs).

Although slightly bulkier, Acer Aspire VX 15 (VX5-591G) is equipped with a battery that has a larger capacity of 52Wh. And finally – the connectivity options are almost the same except for the USB 3.0 Type-A in Nitro 5 vs USB 2.0 Type-A in VX 15 (VX5-591G).

Specs sheet

Series
  • Acer Nitro 5
  • Acer Aspire VX 15 (VX5-591G)
OS
  • Windows 10
  • Windows 10
CPU
  • Intel Core i7-7700HQ
  • Intel Core i5-7300HQ
  • AMD FX-9830P 
  • Intel Core i7-7700HQ
  • Intel Core i5-7300HQ
RAM
  • up to 16GB of DDR4-2133 RAM
  • up to 16GB of DDR4-2133 RAM
Internal storage
  • 2280 PCIe NVMe
  • 2280 PCIe NVMe (M key)
GPU
  • NVIDIA GeForce GTX 1050 Ti (4GB GDDR5)
  • NVIDIA GeForce GTX 1050 (4GB GDDR5)
  • AMD Radeon RX 550 (Laptop) (4GB GDDR5)
  • NVIDIA GeForce GTX 1050 Ti (4GB GDDR5)
  • NVIDIA GeForce GTX 1050 (4GB GDDR5)
Display
  • 15.6”, Full HD (1920 x 1080), IPS
  • 15.6”, Full HD (1920 x 1080), TN
    15.6”, Full HD (1920 x 1080), IPS
Connectivity Wi-Fi 802.11ac, Bluetooth 4.1 802.11ac, Bluetooth 4.0
Features
  • 2x USB 2.0 Type-A
  • 1x USB 3.0 Type-A
  • 1x USB 3.0 Type-C
  • HDMI
  • SD card reader
  • Security Lock slot
  • Dual Fans (+CoolBoost)
  • 2x USB 3.0 Type-A
  • 1x USB 2.0 Type-A
  • 1x USB 3.0 Type-C
  • HDMI
  • SD card reader
  • Security Lock slot
Battery
  • 48Wh, Li-ion, 4-cell
  • 52Wh, Li-Ion, 3-cell
Weight 2.48 kg (5.5 lbs) 2.50 kg (5.5 lbs)

All Acer Nitro 5 configurations

Acer Nitro 5 – $743.35
  • Intel Core i5-7300HQ
  • NVIDIA GeForce GTX 1050 Ti (4GB GDDR5)
  • 256GB SSD
  • 8GB RAM
Acer Nitro 5 – $747.19
  • Intel Core i5-7300HQ
  • NVIDIA GeForce GTX 1050 (4GB GDDR5)
  • 256GB SSD
  • 8GB RAM
Acer Nitro 5 – $750.00
  • Intel Core i5-7300HQ
  • NVIDIA GeForce GTX 1050 (4GB GDDR5)
  • 256GB SSD
  • 8GB RAM

All Acer Aspire VX 15 (VX5-591G) configurations

Acer Aspire VX 15 – $999.99
  • Intel Core i5-7300HQ
  • NVIDIA GeForce GTX 1050 (4GB GDDR5)
  • 256GB SSD
  • 16GB RAM
Acer Aspire VX 15 – $1092.92
  • Intel Core i7-7700HQ
  • NVIDIA GeForce GTX 1050 Ti (4GB GDDR5)
  • 256GB SSD
  • 16GB RAM
Acer Aspire VX 15 (VX5-591G) – $1199.00
  • Intel Core i7-7700HQ
  • NVIDIA GeForce GTX 1050 Ti (4GB GDDR5)
  • 256GB SSD
  • 16GB RAM

(laptopmedia.com, https://goo.gl/X9hdqD)

Acer Nitro 5 vs Lenovo Legion Y520 – what are the differences?

$
0
0

This time we are going to confront other two laptops of the gaming family – we are talking about Acer Nitro 5 and Lenovo Legion Y520.

As usual, we start off with the hardware options. Both laptops are powered by 7th generation Intel Core processors, however, Acer Nitro 5 includes one more option – AMD FX-9830P. In terms of graphics performance, the Acer notebook sports an NVIDIA GeForce GTX 1050 Ti (4GB GDDR5),  NVIDIA GeForce GTX 1050 (4GB GDDR5), as well as AMD Radeon RX 550 (Laptop) (4GB GDDR5) GPU. On the other side, its rival comes with various options to choose from – NVIDIA GeForce GTX 1060 Max-Q (6GB GDDR5) or AMD Radeon RX 560M (4GB GDDR5), just to name a few. It also provides you with larger memory amount – up to 32GB of DDR4-2133 RAM vs up to 16GB of DDR4-2133 RAM in Nitro 5.

Moving on, both notebooks offer the same display option – 15.6-inch Full HD (1920 x 1080) IPS panel. In addition, the difference in thickness is insignificant – Legion Y520 is just 1 mm thinner at 26 mm. It is also the lighter one as it tips the scale at 2.40 kg (5.3 lbs) as opposed to 2.48 kg (5.5 lbs) for its rival. However, Acer Nitro 5 accommodates a 4-cell battery with a larger capacity of 48Wh. As far as built quality is concerned, both laptops feature relatively good constructions despite being plastic. In addition, at the time of writing this article, the Nitro 5 is $140 cheaper than its rival for the same configuration (i5-7300HQ, 8GB RAM, 256 SSD, GTX 1050 Ti). For more information, you can check the prices below.

And finally – the differences in the connectivity options include two USB 2.0 Type-A ports, a single USB 3.0 Type-A port in Acer Nitro 5 compared to a single USB 2.0 Type-A port and two USB 3.0 Type-A ports in Legion Y520.

Specs sheet

Series
  • Acer Nitro 5
  • Lenovo Legion Y520
OS
  • Windows 10
  • Windows 10
CPU
  • Intel Core i7-7700HQ
  • Intel Core i5-7300HQ
  • AMD FX-9830P
  • Intel Core i7-7700HQ
  • Intel Core i5-7300HQ
RAM
  • up to 16 GB of DDR4-2133 RAM
  • up to 32 GB of DDR4-2133 RAM
Internal storage
  • 2280 PCIe NVMe
  • 2280 PCIe NVMe (M key)
GPU
  • NVIDIA GeForce GTX 1050 Ti (4GB GDDR5)
  • NVIDIA GeForce GTX 1050 (4GB GDDR5)
  • AMD Radeon RX 550 (Laptop) (4GB GDDR5)
  • NVIDIA GeForce GTX 1060 Max-Q (6GB GDDR5)
  • NVIDIA GeForce GTX 1050 Ti (4GB GDDR5)
  • Intel HD Graphics 630
  • AMD Radeon RX 560M (4GB GDDR5)
Display
  • 15.6”, Full HD (1920 x 1080), IPS
  • 15.6”, Full HD (1920 x 1080), IPS
Connectivity Wi-Fi 802.11ac 2×2 MIMO
Bluetooth 4.1
Wi-Fi 802.11ac
Bluetooth 4.1
Features
  • 2x USB 2.0 Type-A
  • 1x USB 3.0 Type-A
  • 1x USB 3.0 Type-C
  • HDMI
  • SD card reader
  • audio jack
  • Security Lock slot
  • Dual Fans (+CoolBoost)
  • 1x 2.0 USB Type-A
  • 2x 3.0 USB Type-A
  • 1x USB 3.0 Type-C
  • SD card reader
  • audio jack
  • Security Lock slot
Battery
  • 48Wh, Li-ion, 4-cell
  • 45Wh, Li-ion, 3-cell
Weight 2.48 kg (5.5 lbs) 2.40 kg (5.3 lbs)

All Acer Nitro 5 configurations

Acer Nitro 5 – $743.35
  • Intel Core i5-7300HQ
  • NVIDIA GeForce GTX 1050 Ti (4GB GDDR5)
  • 256GB SSD
  • 8GB RAM
Acer Nitro 5 – $747.19
  • Intel Core i5-7300HQ
  • NVIDIA GeForce GTX 1050 (4GB GDDR5)
  • 256GB SSD
  • 8GB RAM
Acer Nitro 5 – $750.00
  • Intel Core i5-7300HQ
  • NVIDIA GeForce GTX 1050 (4GB GDDR5)
  • 256GB SSD
  • 8GB RAM

All Lenovo Legion Y520 configurations

Lenovo Legion Y520 – $879.99
  • Intel Core i5-7300HQ
  • NVIDIA GeForce GTX 1050 Ti (4GB GDDR5)
  • 256GB SSD
  • 8GB RAM
Lenovo Legion Y520 – $945.98
  • Intel Core i7-7700HQ
  • NVIDIA GeForce GTX 1050 Ti (4GB GDDR5)
  • 1000GB HDD
  • 8GB RAM
Lenovo Legion Y520 – $949.00
  • Intel Core i7-7700HQ
  • NVIDIA GeForce GTX 1050 Ti (4GB GDDR5)
  • 1000GB HDD
  • 8GB RAM
(laptopmedia.com, https://goo.gl/qnQwY1)

MSI Vortex G65VR 6RF Review

$
0
0

Our Verdict

The MSI Vortex G65 is a one of a kind gaming PC. It has the performance, the looks, but comes at a steep price. While you can build a cheaper gaming PC, which will provide better performance, it wouldn’t look half as good.

PROS

  • Looks good
  • Portable
  • Performs well
  • Silent
  • Supports 6 displays

CONS

  • Expensive
  • Slight throttling issues

MSI Vortex G65VR 6RF: Detailed Review

I have been a PC gamer for as far back as I can remember. I have watched the PC industry shift from 32MB of RAM to 32GB. I have also witnessed the evolution of computer graphics, from the blocky character models of Roadrash to the super realistic textures of Battlefield 1. However, in the last quarter century, the humble PC gaming tower has remained primarily the same. It became smaller over time, but it the squarish guise has remained more or less the same, until last year when MSI introduced this, the Vortex.

To be fair, this is not really an original design since Apple already made a cylindrical PC back in 2013, with the Mac Pro. However, Apple would be the first to point out that the Mac Pro is a Mac, not a PC. The Vortex, however is not just a PC, but a gaming PC at that. It has the same upgradability restrictions as the Mac Pro, but the Vortex packs more powerful hardware in this cylindrical chassis.

I was a little skeptical on the whole cylindrical design, especially after Apple admitted how they “designed themselves into a thermal corner”, with the 2013 Mac Pro. I must admit, I was sort of prejudiced before I even started this review, but after using the Vortex for almost a month, I am quite convinced that MSI did its homework well.

Build and Design: Trashcan done right

The cylindrical design does suggest an Apple Mac Pro lineage, but MSI has changed some things to incorporate all that top shelf gaming hardware into a reasonably tiny 6.5L chassis. The outside shell is made out of a plastic composite and feels metallic to touch. It seems durable as well, although only long term users will be able to shed more light on that.

If we talk about aesthetics, the Vortex G65 is not exactly symmetrically cylindrical, like the “trash can”, and has slightly accentuated creases around the body. The front, back and even the top area is illuminated with RGB lighting, which is user controllable via software or using the MSI Dragon app, adding to its…umm…swag value.

While the outside of the desktop looks absolutely amazing, what is far more awe-inspiring is how hardware is packed inside. The internal layout of the Vortex resembles a similar assembly to the 2013 Mac Pro, with its custom 450W 80 plus gold PSU, fixed in the middle of the triangular frame. It is flanked by the CPU on one side, while the other has the custom, yet still desktop grade, NVIDIA GeForce GTX 1080 GPU. The third side of the triangular frame carries the two NVMe SDDs, which come pre-configured in RAID4. This third side of the frame can actually house a second GPU, as in some markets the machine is sold with two NVIDIA GPUs in SLI. In India it is repurposed for the SSDs.

MSI has designed a custom logic board that is broken down into three major boards. The main board holds the CPU and RAM slots, another sits at the back, enabling all the back panel I/O, plus the rear mounted hard drive. Lastly, there is a third logic board that sits in the base, drawing power from the PSU. This connects to the main logic board, carrying the CPU and RAM, to the GPU via a custom PCI x16 connector and the rear I/O via ribbon cables. The SSDs also connect to the bottom board through an MXM connector to the PCIe slot. In essence, it is a complete nerd fest under the hood, but at the same time means that the motherboard are GPU is non user replaceable. Also, even though MSI allows users to replace the CPU, you can’t just put any CPU in there. The custom heatsink and cooling may not do justice to just any CPU.

Talking about cooling, the entire chassis is solely cooled by a single fan at the top and from what I have observed, it does a really good job at cooling the unit. I will talk about the cooling efficiency in the performance section.

I/O: Clean and clinical

To go with the whole design, MSI got rid of the front I/O, which is a double-edged sword. The decision makes sense from a design point of view, as the Vortex looks more aesthetically pleasing this way. However, at the same time, I had to pick the whole unit up whenever I wanted to plug in a pen drive. You pick up the unit, place it on the side and then put the drive in the appropriate slot.

However, besides this small inconvenience, I am pretty happy with the rear I/O selection of the unit. Starting at the top, you get an optical Sound in port, standard 3.5mm headphone out and mic in jacks. There are also 4 USB 3.0 ports, 2 HDMI out ports, 2 Killer ethernet ports, along with Killer WiFi. In addition, there are two mini display ports, along with two Thunderbolt 3 ports that support 4K@60fps. If you are counting, the MSI Vortex G65 can support 6 displays at a time, and I have seen it do so in person.

Performance: Hitting the sweet spot

The MSI Vortex G65 has an extremely powerful resume and the performance figures are in line with that. The Intel core 7700K combined with the NVIDIA GeForce GTX 1080 allows the user to play all its favourite games at the highest settings in 1080p. The machine will also run all AAA titles and demanding games in 2K effortlessly. To ensure optimal performance on 2k, it is better to have a G-Sync ready monitor, that will allow for consistent frame rates across games respectively.

Games like Battlefield 1 ran flawlessly in 1080p, pushing 80+ fps with DX12 enabled at ultra settings, without any hiccups. Going up to 2K resolution, the fps counter averaged at 58fps at ultra settings. It was only when I switched to a 4K display that the FPS counter tumbled down to below 50fps. However, even at 4K, the machine maintained an average frame rate of 46fps. More recent games like Dishonored 2 also ran smoothly, chugging out more than 60fps even at 4K. I also tested some older titles, such as Metro Last light, which also ran happily at 125fps and 95fps, at 1080p and 2K resolutions respectively.

The Vortex’s powerful performance is further seconded by the synthetic benchmark figures. The machine scored 6029 points on PCMark 8 Creative. It performed quite well on Cinebench 15, which is a good test for graphics performance. The Vortex scored 150.65fps.

All this performance is derived out of a machine that is cooled by a single fan only, mounted at the top of the MSI Vortex, which cools everything inside the machine. To counter the heat, there is a vapor chamber right on top of the two main components – CPU and GPU. These vapour chambers spread the heat to the heat spreaders, running along the entire length of both the GPU and CPU. The system sucks cool air from the bottom and throws hot air out of the top, taking that heat off the heat spreaders.

At full loads, the CPU maintained temperatures around 96 degree celsius, with the GPU hitting 80 degrees. While the GPU did not show any signs of faltering, I did find the the CPU being throttled down about 200-250MHz. However, it did not seem to have any immediate effects on the gaming performance of the machine. The desktop also supports overclocking of both the GPU and CPU, which seems like a stretch without a water-cooled CPU. But after stress testing the Vortex for over an hour, I am convinced that the MSI’s “Storm cooling” trick works. In addition, the single fan remains unbelievably silent even at higher loads.

All the overclocking, system monitoring, RGB toggles can be done via the Dragon Centre application, which comes pre-installed in the machine and is quite easy to use. However, I would suggest you read the instructions before you proceed. Moreover, like all previous MSI laptops we tested, the app on this machine can also be logged into via a phone app as well.

Bottomline

The MSI Vortex G65 is a one of a kind gaming PC. It is small, cylindrical and unlike any other gaming PC you may have seen. However, for all its curved looks and RGB studded glory, you have to pay a premium. That said, the system can run circles around all kinds of processor intensive tasks and can run even the most demanding games at 1080p and 2K resolutions, without any issues. Gaming in 4K is also possible and all games would work well, but if you are looking for 60fps in 4K gaming, then this is not the machine for you.

How it compares

The biggest competitor to the MSI Vortex G65 VR is the Asus ROG G20CB, which is another small pre-configured NVIDIA GeForce GTX 1080 powered PC, available off the shelf. It features pretty much the same hardware and is cheaper too. However, the G20CB misses out on some key I/O ports and is not as overclockable as the Vortex.

This means, that the synthetic benchmark scores are marginally higher than the Asus ROG G20CB. I presume that the higher performance from the Vortex could be due to newer drivers and the fact that it runs the latest version of Windows 10, but admittedly I’m a bit uncertain about that at the moment.

Moreover, you can definitely get better performance out of an assembled custom PC with off the shelf parts. That would be advisable if you are looking to overclock, and cheaper to build as well. However, you won’t get the small footprint and the swag factor the Vortex G65 comes with, which is something you can only get by paying the premium.

(digit.in, https://goo.gl/a5iiTX)

Acer Predator Helios 300 (15″) vs Lenovo Legion Y520 – what are the differences?

$
0
0

Another day, another battle between two premium laptops – this time it is Acer Predator Helios 300 (15″) vs Lenovo Legion Y520. If you want to find out what the major differences between them are, then keep on reading.

Starting off with hardware options, both laptops are powered by 7th generation Intel Core processors. However, the difference comes in the graphics part as Acer Predator Helios 300 sports the full version of the NVIDIA GeForce GTX 1060 GPU which is more powerful than the NVIDIA GeForce GTX 1060 Max-Q in its rival. On the other hand, Lenovo Legion Y520 comes with a larger amount of memory – up to 32 GB of DDR4-2133 RAM.

Moving on, both notebooks offer the same display option – a 15.6-inch Full HD (1920 x 1080) IPS panel. However, there is a slight difference in terms of overall dimensions. The Lenovo Legion Y520 appears to be the more portable laptop as its 2.40 kg (5.3 lbs) construction features a 26 mm profile as opposed to 2.70 kg (6 lbs) and 27 mm for its opponent but this is nothing drastic. Another contrast between the two devices is that Acer Predator Helios 300 (15″) sports a chassis partly made of metal.

And finally, the connectivity options are almost identical except for the presence of a single USB 3.0 Type-C port in Lenovo Legion Y520.

Specs sheet

Series
  • Acer Predator Helios 300 (15″)
  • Lenovo Legion Y520
OS
  • Windows 10
  • Windows 10
CPU
  • Intel Core i7-7700HQ
  • Intel Core i7-7700HQ
  • Intel Core i5-7300HQ
RAM
  • up to 16 GB of DDR4-2133 RAM
  • up to 32 GB of DDR4-2133 RAM
Internal storage
  • HDD/SSD
  • 2280 PCIe NVMe (M key)
GPU
  • NVIDIA GeForce GTX 1060 (6GB GDDR5)
  • NVIDIA GeForce GTX 1060 Max-Q (6GB GDDR5)
  • NVIDIA GeForce GTX 1050 Ti (4GB GDDR5)
  • Intel HD Graphics 630
  • AMD Radeon RX 560M (4GB GDDR5)
Display
  • 15.6”, Full HD (1920 x 1080), IPS
  • 15.6”, Full HD (1920 x 1080), IPS
Connectivity  802.11ac, 2×2 MIMO (Dual-Band 2.4GHz / 5GHz)
Bluetooth 4.0
Wi-Fi 802.11ac
Bluetooth 4.1
Features
  • 2x USB 2.0 Type-A
  • 2x USB 3.0 Type-A
  • HDMI
  • SD card reader
  • 3.5mm audio jack
  • Security Lock slot
  • 1x 2.0 USB Type-A
  • 2x 3.0 USB Type-A
  • 1x USB 3.0 Type-C
  • SD card reader
  • audio jack
  • Security Lock slot
Battery
  • 3220 mAh, Li-ion, 4-cell
  • 4110 mAh, Li-ion, 3-cell
Weight 2.70 kg (6 lbs) 2.40 kg (5.3 lbs)

All Acer Predator Helios 300 (15″) configurations

Acer Predator Helios 300 (G3-571) – $1049.99
  • Intel Core i7-7700HQ
  • NVIDIA GeForce GTX 1060 (6GB GDDR5)
  • 256GB SSD
  • 16GB RAM
Acer Predator Helios 300 – $1335.99
  • Intel Core i7-7700HQ
  • NVIDIA GeForce GTX 1060 (6GB GDDR5)
  • 1000GB HDD + 256GB SSD
  • 12GB RAM
Acer Predator Helios 300 – $1359.99
  • Intel Core i7-7700HQ
  • NVIDIA GeForce GTX 1060 (6GB GDDR5)
  • 1000GB HDD + 256GB SSD
  • 16GB RAM

All Lenovo Legion Y520 configurations

Lenovo Legion Y520 – $879.99
  • Intel Core i5-7300HQ
  • NVIDIA GeForce GTX 1050 Ti (4GB GDDR5)
  • 256GB SSD
  • 8GB RAM
Lenovo Legion Y520 – $945.98
  • Intel Core i7-7700HQ
  • NVIDIA GeForce GTX 1050 Ti (4GB GDDR5)
  • 1000GB HDD
  • 8GB RAM
Lenovo Legion Y520 – $949.00
  • Intel Core i7-7700HQ
  • NVIDIA GeForce GTX 1050 Ti (4GB GDDR5)
  • 1000GB HDD
  • 8GB RAM

(laptopmedia.com, https://goo.gl/8C56uF)

Synology DS1817+ Review

$
0
0

For a number of years now, I have been a big fan of network attached storage (NAS) in order to keep all of my data in one place and simplify my photography workflow. Having access to the same fast storage from multiple machines, as well as the Internet, is important for my needs, so I have been utilizing NAS heavily at my home office. Ever since I got a hold of the Synology DS1815+, I have been a big fan of Synology products. However, there has been one main limitation that I have been struggling with when processing large files or accessing storage from multiple computers, and that is network throughput limitations. With the DS1815+ model only featuring 1 Gbit Ethernet ports, I have been limited to a maximum total of 100-120 MB/sec transfers, which is simply insufficient in today’s high-resolution photo and video environments. So as soon as Synology announced its DS1817+unit with the capability to add a 10 Gbit network card, I knew I had to move up to it. In this review, I will provide detailed information on the Synology DS1817+ NAS and provide detailed information on what one can expect from it in terms of performance and network throughput.

Synology DS1817+

Let’s go over the base specifications of the Synology DS1817+ first.

1) Synology DS1817+ Overview

Synology has a large array of different storage solutions that it offers to individuals and small businesses, as well as larger enterprises and the DS1817+ is a NAS device that is aimed specifically at small to medium size businesses. With its ability to accommodate up to eight 3.5″ drives and a very robust and scalable architecture that can handle up 96 TB of total storage (with 8x 12 TB drives and even more with expansion units) and up to 10 Gbit of network throughput with an add-on card, the DS1817+ is a powerful NAS that can address a lot of storage needs. Similar to its predecessor, it runs the same Quad Core 2.4 Ghz Intel Atom C2538 processor, which Synology chose for reduced power consumption and long-term efficiency, but its RAM can now be upgraded all the way to 16 GB (while the DS1815+ was limited to 6 GB total). Ability to expand RAM up to 16 GB is important, because one can run more apps in the background on the new unit. Speaking of apps, that’s the beauty of Synology NAS devices – we are not just talking about a pure storage device, but a pretty robust server that can host a number of web server applications for backup, file hosting, scripting and much more. You can host your own WordPress site and even use the Synology DS1817+ as your home iTunes server. In addition to these, the new DS1817+ has all 8 internal SATA ports at 3 Gbps, whereas the DS1815+ was limited to 1.5 Gbps on ports 7 and 8 (chipset limitation). This means that you can run the DS1817+ at full speed with all 8 drives, something you could not do on the previous generation NAS.

But the biggest and the most important change is the ability to add an extra PCIe card, something one could not do on the DS1815+. The extra slot can be used for either a dedicated 10GbE card, or an adapter that can take dual M.2 SSD drives for cache. This is a very important and welcome change, since it is now possible to take a full advantage of the combined speed of hard drives over 10 Gbit/sec – the DS1817+ is capable of pushing up to 1,179 MB/s read and 542 MB/s write speeds, which is just under the maximum throughput of 1,250 MB/sec of 10 Gbit network. See the next section on what I purchased for my network to get the best out of the unit.

Take a look at the back of the DS1817+:

Synology DS1817+ Back

As you can see, the right side of the unit has a slot for a PCIe card. In order to make room for this, Synology moved all interface ports such as Gigabit LAN, USB and eSATA to the bottom of the unit. This slightly changed the dimensions of the unit and made it a bit larger compared to its predecessor (166 x 343 x 243mm vs 157 x 340 x 233mm), but the difference is quite minimal and not very noticeable when the two are put side by side.

Just like all other popular NAS storage solutions, you can utilize pretty much any kind of RAID for storage: from Synology’s proprietary “Hybrid RAID” all the way to RAID 10. The device will also allow expanding your storage with additional or larger drives with Hybrid RAID and other RAID protocols like RAID 5 and 6, so it is a pretty flexible system.

The Synology OS supports many different types of file systems like EXT4, FAT, NTFS and HFS+ and many network protocols are available to provide the best security and compatibility between different operating systems. I have been using both DS1815+ and DS1817+ from both Windows and MacOS computers and I have also connected a number of other network devices to them to stream HD content through the network. And that’s the whole point of owning a Synology NAS device – you can put everything you have on the network and centralize your data for shared access between devices. In contrast, a direct-attached storage (DAS) device does not have such capabilities and would require a connected computer to be able to share its data with other devices – see the DAS vs NAS section of the Storage for Photography article for more details.

When it comes to interfaces, they are pretty similar to what was already there on the DS1815+. There are 4 total 1 Gbit RJ-45 LAN ports for network connectivity, which you can use if you are not planning to use 10 Gbit network and aggregate, if needed. There are a total of 4x USB 3.0 ports (3x on the back, 1x in the front) to connect other devices and external hard drives. And if you have storage devices that connect via eSATA, there are two of those ports available on the back as well. In addition to being able to connect external hard drives, you can also connect a wireless adapter to allow connecting to the device wirelessly.

Size-wise, the DS1817+ is fairly large, but pretty compact for an 8-bay unit. It weighs 6.0 kg without hard drives and has two large 120mm fans on the back of the unit for cooling and quieter operation. Additional notes on how quiet the unit is are provided further down in the review under the “Noise” section.

Just like its predecessor, the DS1817+ comes with a 3 year manufacturer-backed hardware warranty.

Below are the technical specifications of the Synology DS1817+:

Description Specification
* exFAT Access is purchased separately
CPU Intel Atom C2538
System Memory 2 GB or 8 GB, expandable up to 16 GB (2x memory slots)
Drive Bays 8
Maximum Drive Bays with Expansion Unit 18
Drive Interface SATA 6Gbps/3Gbps; Hot-swappable
Maximum Internal Raw Capacity 96 TB (8x 12 TB drives)
Maximum Raw Capacity with Expansion Units 216 TB (18x 12 TB drives)
Maximum Single Volume Size 108 TB
Ports / Interfaces 4x RJ-45 1GbE LAN, 4x USB 3.0, 2x eSATA
Buttons System Power Button (front)
Dimensions 166 (H) x 343 (W) x 243 (D) mm
Weight Net (NAS only): 6.0 kg
Noise Level 22.2 dB(A)
Temperature and Relative Humidity 5°C to 40°C / 5% to 95% RH
Power Supply Input: 100-240V~, 50/60Hz, Single Phase; Output: 250W
PCIe Expansion 1 x Gen2 x8 slot (x4 link)
Add-in-card Support M2D17 – Dual M.2 SSD adapter card for SSD cache
PCIe Network Interface Card (Learn more)
Power Consumption 61.5 W (Access), 31.6 W (HDD Hibernation)
BTU 156.55 BTU/hr (Access), 86.09 BTU/hr (HDD Hibernation)
Fan 2x 120 x 120mm fans
Operating System DSM 6.1
Supported Client OS Windows 7 and 10, Mac OS X 10.11 onward
Supported Browsers Chrome, Firefox, IE 10+, Safari 10+
File System Btrfs, EXT4, EXT3, FAT, NTFS, HFS+, exFAT*

The full list of specifications can be found on Synology’s website.

2) 10 Gbit Network Card Setup

The Synology DS1817+ does not come with a 10 Gbit setup ready to go, so you will need to get the right network card for it. Synology sells two network cards that are compatible with the DS1817+ (models E10G15-F1 and E10G17-F2), but those only give you SFP+ connectivity. Unless you want to mess with getting SFP adapters and fiber cables, I would not mess with that option and instead go straight with RJ45, which is simpler and cheaper to implement. Grab a dual port X540-T2 and you are all set on the Synology side. For your computer, get the cheaper single port X540-T1 or any other 10 Gbit RJ45 card that you can find, plus a CAT-6 crossover cable and you are good to go! This is the cheapest way to get 10 Gbit network without having to buy an expensive 10 Gbit switch. If you have another computer that needs 10 Gbit access, then use the other 10 Gbit port on the network card. What about access to the network and the Internet? Since the Synology DS1817+ comes with 4 extra Gigabit ports, you can connect any of those ports to your local network and your router, so that you can access the device from your LAN or the Internet. Now if you want to have a full 10 Gbit network with a proper switch, then take a look at my 10 Gbit for Photography Needs article, which covers everything you need to know about such a setup.

3) Hard Drive Installation

Installing hard drives is very easy. All you have to do is push the lower part of a drive bay, then pull out the drive tray. You would have to remove the fastening panels on the sides, then put the 3.5″ drive with its connections facing the other way, then finally attach the panels and use four screws to secure the drive. You can install all 8 drives in 5-10 minutes easily. The drive trays work with both 3.5″ and 2.5″ drives. If you have 2.5″ regular or SSD drives, you will have to mount those from the bottom of the tray. The last step is to insert the tray back into the unit – push it all the way in so that the power and data ports connect properly and securely. Obviously do all this while the device is powered off! If you want to prevent accidental removal of drives, you can use the provided tray key to lock each drive tray.

You can find all this information in the installation manual, with images to assist you in the process:

Installing Drives

4) Hard Drive and RAID Recommendations

While you can certainly use any drive type and you can also mix and match any size drives, I would recommend to thoroughly plan your storage space in advance. If you are only starting up with a few drives, start out with larger capacity ones so that you can simply add similar drives in the future. If you utilize RAID (and you should), it is always best to use the same drives with the same capacity. For the DS1817+, I would start out with a minimum of 4 drives for a RAID 6 array. Although Synology’s Hybrid RAID sounds appealing, I would only consider it for an environment with different capacity drives. Since modern hard drives have a lot of capacity today (up to 12 TB), I would not recommend RAID 5 for a large capacity SAN or a DAS unit – go for RAID 6 or RAID 10 instead. RAID 6 is a bit slower than RAID 5, but the extra parity scheme will ensure that your data is still retained in case another drive fails during the rebuild process.

As for drive recommendations, there are lots of options out there and it really depends on your budget and your needs. For most people, I would recommend to go with drives specifically created for NAS environments, such as HGST’s 8 TB NAS drives. If you have a larger budget, the HGST 10 TB NAS drives are very nice and if you want to max out the capacity of each drive, Seagate’s 12 TB IronWolf drives are the way to go. Personally, I have always had good luck with HGST drives and I have yet to see one fail, so it is definitely the brand I would recommend for long term NAS use.

5) Getting Started

Synology really worked hard on making its graphical user interface (GUI) very easy to use and you do not need to have any advanced storage or programming skills to get it up and running. Once you connect the DS1817+ to your network and attach the power cable, simply press the power on button on the front of the device and it will start booting. You will hear a beep once it boots up. You can then fire up your browser and type “find.synology.com” or “diskstation:5000” in the URL and you should see a screen that says “Web Assistant”:

Synology Web Assistant

Just click the “Connect” button in the center and you can start the setup. If nothing shows up when you type the above in your web browser, my recommendation would be to download the “Synology Assistant” utility from Synology’s web site. As long as your network is operational and you have a running DNS server (which should be your router), it should work.

The installation process from there is very simple. First, install Synology DiskStation Manager (DSM), which is Synology’s operating system, which you will be guided to do during the setup process:

Synology Install DSM

The system will warn you that all data will be wiped out from the hard drives that are installed, which is fine, considering that you have brand new drives mounted in the unit. It will take about 10 minutes to install and reboot the unit, with the latest version of DSM up and running. From there, it will ask you for things like server name, username and password, so make sure you specify those. You will then specify when to check and install the latest version of DSM as it becomes available – I chose to install the latest versions automatically very early on Tuesday and Saturday of the week:

Synology DSM Update Schedule

As you can see, I also enabled SMART checks and bad sector warnings in case drives start to fail.

After that, you will be able to login to your new DSM install. Once in, go ahead and go to the Control Panel and head on to “Update & Restore” to update the operating system to the latest version. After the update process is complete, the system will reboot and you will hear another beep that indicates system readiness. From there, head on to configure the storage by clicking the icon on the top left side of the screen and selecting “Storage Manager”:

DSM Controls

For my setup, I clicked on “Volume” and created a new RAID 6 volume that spans all 8 drives and picked “Btrfs” as the file system (recommended by Synology):

Synology RAID 6 Storage Manager

The process of building the RAID 6 array is quite long – the parity consistency check is going to run for a couple of days, depending on how big the drives are. Although you can access the volume while that is taking place, I would recommend to let it run and complete fully, just in case. This way, if any errors take place, you will be able to catch them early on.

6) Setting Up the NAS and Shared Folders

After you have the array going, the next step is to create a network share. Go to Control Panel, click “Shared Folder” and you will see a list of current shared folders. I went ahead and created two separate folders: “Storage” for my main storage where I put all work-related files, photos, videos, etc.:

Synology Create Shared Drive

The nice thing about Shared Folders, is that you can create as many of those as you would like and they keep files and folder separate, while sharing the total disk space. You don’t have to worry about things like partitioning your volume into sub-volumes.

The next step is to create users and assign permission to shared folders. Simply click the “User” icon in Control Panel and create your users. I created a couple of users for me to use on the network:

Synology Users

Then went back to the created Shared Folders and modified the permissions for those users to allow Read and Write operations.

Another area to check is “File Services”. If you want to access the network share from different operating systems, you need to make sure that particular services such as SMB, AFP and NFS are enabled (depending on what you are planning to use):

Synology File Services

The next step was to visit the “Network” icon and set things like Server Name and IP address, so that I could easily access the device on my network and not worry about changes when I reboot the device or my router.

That’s really it!

7) PC and Mac Access

All you have to do from there is type “\\Server Name” in “My Computer” within Windows OS and you will see a list of shared volumes:

Windows File Shares

If you have a Mac, you should see the Synology DS1817+ device under “Shared” within your Finder. For easier access, you can drag and drop the shortcut to your Desktop.

8) Connecting External Devices

The Synology DSM OS will automatically recognize practically any connected storage and automatically share the device. Once you change permissions, you will be able to access the connected device just like you can connect to the other network shares, as seen below.

Synology External Devices

Next, make sure that you set the appropriate permissions under “User” to the connected device. You are done, now you can access everything in that external drive:

Windows File Share External Drive

This is particularly useful for backup purposes. Don’t forget that your Synology device should NEVER be the only source of your files. You should always keep a backup of everything, particularly your critical files somewhere else. So my recommendation would be to get separate external drives that you could use for local and off-site backups. You can manually copy files, or you can use Synology’s “Backup & Replication” tool, or the “Cloud Station” app to backup your files from the device to external drives or to the cloud.
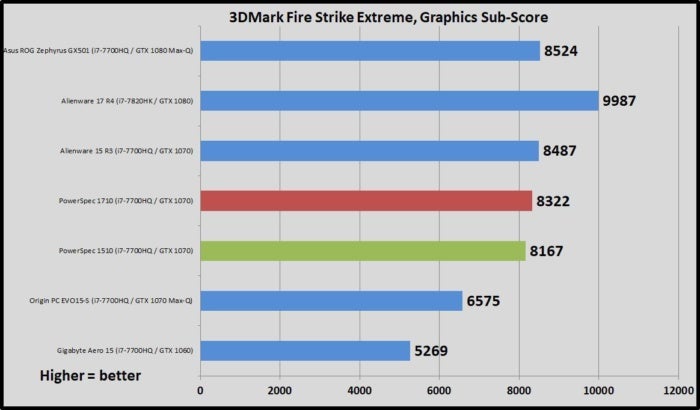
9) Performance

Performance-wise, the Synology DS1817+ is pretty incredible when accessed via 10 Gbit network. I have already pointed out that it can do as much as 1,179 MB/s read and 542 MB/s write speeds, but those are the numbers provided by Synology in their own lab. I wanted to see how far I could get with the 7200 RPM performance NAS drives I hooked up to my DS1817+. I performed two different kinds of tests – one was to see how fast RAW image file transfers would be when compared to the older DS1815+ unit, then the second test was to do pure performance benchmarks using CrystalDiskMark and compare the results with the QNAP TVS-882T that I have been using simultaneously in my 10 Gbit network environment.

Here is what the result looks like when copying a total of 688 images. First, with the Synology DS1815+ that is limited to 1 Gbit/sec throughput:

Synology DS1815+ File Copy

As expected, the bottleneck on the DS1815+ is its gigabit interface that slowed things down drastically. On average, I got about 104 MB/sec speeds and it took 2 minutes and 20 seconds to copy the files. Next, I tested the DS1817+ over the 10 Gbit interface:

Synology DS1817+ File Copy

That’s a whole lot better at 427 MB/sec – it only took 34 seconds to complete the whole operation, which is pretty impressive. Those are the kinds of speed improvements you can expect from a fast NAS device!

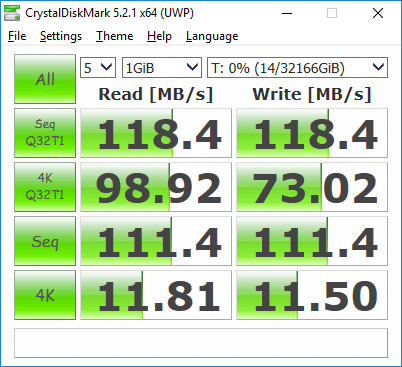
The same thing can be expected when performing tests over CrystalDiskMark:

Read and Write Performance 1GbE

Synology DS1815+ Read and Write Performance Over 1 GbE

Synology DS1817+ Performance

Synology DS1817+ Read and Write Performance Over 10 GbE

It is very clear that the Synology DS1817+ is the way to go for any environment where storage performance is important. As you can see, one can get over 10x read performance and close to 5x write performance when using the DS1817+ over the DS1815+. Sequential read and write performance is also impressive – over 6x read and over 4x write performance advantage.

10) Synology DS1817+ vs QNAP TVS-882T

When it comes to comparing the Synology DS1817+ to the QNAP TVS-882T, the latter has a lot more features in comparison, thanks to its PC-like architecture. The QNAP is a robust storage solution with built-in storage tiering, something that is rarely ever found on non-enterprise devices. It has the ability to host up to 2x M.2 drives (SATA only, no NVMe) right on the motherboard, while if you go with M.2 drives on the Synology DS1817+, you will need to use the single available PCIe slot, compromising the 10 Gbit connectivity option. The QNAP TVS-882T can be expandable up to 64 GB of DDR4 RAM, thanks to its 4x RAM slots, whereas the Synology DS1817+ is limited to 16 GB. Lastly, the QNAP can be directly connected to a monitor or a TV for output (3x HDMI ports) and can be used as both NAS and DAS (2x Thunderbolt 2 ports), whereas the DS1817+ lacks such connectivity options – it is simply a NAS storage device and it is only designed for this one task.

At the same time, the two storage units are designed completely differently in terms of architecture. Since the QNAP TVS-882T is basically a powerful PC with a full-size CPU, it eats up quite a bit of power, whereas the Synology DS1817+ is extremely power efficient, consuming as little as 32 Watts when hard drives are in hibernation mode and only double that at full speed. There is also a big difference in pricing between the two – the Synology DS1817+ costs only at $850 for the 2 GB RAM version and $950 for the 8 GB RAM version (plus the cost of 10 GbE network card), whereas the QNAP TVS-882T goes for $2,500 (10 GbE included). Therefore, for someone who wants an affordable storage solution, the DS1817+ is relatively inexpensive both in terms of upfront and future energy costs.

What about performance differences between the two? Let’s take a look:

Synology DS1817+ Performance

Synology DS1817+ Read and Write Performance Over 10 GbE

QNAP TVS-882T Performance

QNAP TVS-882T Read and Write Performance Over 10 GbE

As you can see, the Synology DS1817+ is able to match the sequential read speed of the QNAP TVS-882T and it is not all that far off in sequential writes either, which is pretty impressive for a low-powered NAS device. However, when it comes to random reads and writes, the story is a bit different and that’s where things like storage tiering with faster SSD drives can make a difference for the QNAP. As shown in the above chart, the QNAP was able to achieve 2.5x faster read and 2.4x faster write performance, which is certainly a significant difference. So depending on your workload and requirements, you might want to evaluate both and see which one is the preferred solution.

11) Noise

Although the DS1817+ is designed to be a very quiet NAS, once you load it up with fast 7200 RPM NAS drives, it will surely add quite a bit more noise to the unit. I would recommend against putting the DS1817+ on your desk, because micro-vibrations might create extra unwelcomed noise. Putting it on the floor with straight and firm surface would be a better choice, but ideally, it is best to keep it in a separate server or storage room to make it less irritating. That’s the general problem with all NAS and DAS units though, as they can add a bit too much noise to the environment. Just make sure that you are providing adequate cooling and monitoring the device through the network, so that you get alerted if one of the drives fails. Noise levels on the DS1817+ are a bit better than on the QNAP TVS-882T, thanks to its larger and quieter fans. When QNAP gets hot and its fans speed up, it gets noisier in comparison, since it has a total of 3 smaller fans (2x 80mm and 1x 90mm for the CPU). Synology measured the noise levels at 22.2 dB with the device loaded with 8x 1 TB Western Digital 5400 RPM drives. So expect the unit to be a bit louder with 7200 RPM NAS drives.

12) Sharing Lightroom Photos

Since getting a hold of the DS1817+, I have completely migrated all of my photos to the unit and have it actively back-up all the data to another smaller SAN – I no longer store any photos on my computer. Here is my current workflow:

  • The “Photos” folder, along with each year subfolders are located on the DS1817+:
    NAS Folders
  • All Catalog files (without subfolders) are backed up in a “Lightroom” folder on the DS1817+:
    Lightroom Catalog Files
    I create catalogs for each year, as explained in my “How to organize photos in Lightroom” article.
  • I store all Lightroom catalogs on each device separately, in the fastest drive available (usually SSD or M.2 NVMe Flash drive).
  • When accessing photographs from catalogs, all files are mapped to the DS1817+, as seen below:

Lightroom Library Network

  • The above process works the same for every device that needs to access photos. The only thing I need to do is copy Lightroom catalogs locally to each computer and keep them up-to-date, since Lightroom does not allow opening catalogs from network shares and it does not support multi-user access.

Since all photographs reside on the NAS, I no longer have to worry about backups either, as explained below.

13) Automated Backups to Another Synology Array

In addition to the Synology DS1817+, I own the fire-proof and water-proof ioSafe 214, which I now utilize purely for backup purposes. If you own a Synology or an ioSafe device that relies on Synology DSM, you can use the free Cloud Station app on both devices to keep all of your critical files in sync. This app works beautifully, because all changes to your primary storage will automatically replicate everything into the backup storage over the network. And if you keep your secondary backup storage in a different physical location (which is a great idea), you can configure the two devices to sync over the Internet. Since the app would be native to both units, unless your network goes down, you do not have to worry about synchronization issues.

Synology Cloud Station

Looking at both the Cloud Station app on my DS1817+ and the Cloud Station Client, I can see that all the files are being synchronized without any issues and the latest data is available on both. It is good to know when your data is safe in case anything happens! And if you work in a workgroup environment and want to recover changed files, there is even built-in version control, which is very nice.

14) Summary

Having been using the Synology DS1817+ for the past 6 months, I have to say that I am very pleased with its overall performance. While the previous generation DS1815+ served me well for several years, its biggest limitation was its network throughput – with only 1 Gbit network ports, there was only so much I could do over the network, which forced me to only use it for backup and secondary storage purposes. With the DS1817+ upgrade and the new ability to run 10 Gbit network, I was able to fully take advantage of the NAS, which enabled me to transfer files at incredibly fast speeds that even surpass my local SSD drives in terms of read and write performance. Because of this, I ended up migrating all of my images to the NAS and use photo editing tools like Lightroom and Photoshop to open files directly from the network share. With the DS1817+, I was able to simply my workflow even more and take advantage of automatic backups that replicate my data across several other storage devices.

With its sub-$1K price-tag, the Synology DS1817+ delivers a lot of value for the money, so it is an excellent network attached storage and backup choice for both photographers and videographers alike. With hard drives increasing in capacity and costs decreasing year by year, purchasing a solid device like the DS1817+ will cost less than buying a high-end professional camera like the Nikon D850. With the setup I proposed above, you can get a fully loaded system that gives you up to 48 TB of usable space at $2,000 for 8x 8 TB drives and $850 for the DS1817+, totaling roughly $2,850. And if you want to get started with less drives, you can decrease that cost even further. The point of NAS devices like the DS1817+ is to consolidate all of your data in one place, which it does beautifully. I can access all of my data from every device at home and even from remote locations, which is amazing. Synology’s DSM is the easiest operating system I have used to date and it gives so many options to expand the functionality of the device directly from the GUI without messing with any command prompts. If you are a working professional or an enthusiast with high storage needs and you are looking for a storage solution you can depend on, you should take a serious look at the Synology DS1817+.

Lastly, if you find 8 bays to be too much for your needs today, Synology offers smaller solutions as well, like the 5-bay DS1517+, which is also an excellent choice for photography and videography needs, sporting very similar features as its bigger brother.

(photographylife.com, https://goo.gl/zYacKm)

Alienware Area 51 Threadripper Edition review: The best pre-built gaming PC ever

$
0
0

Alienware’s Area 51 Threadripper Edition is unmatched when it comes to gaming performance but it’s ludicrously expensive

Pros
  • Unmatched performance
  • Easily upgradeable
  • Efficient cooling
Cons
  • Expensive

AMD’s new lineup of processors, under the Ryzen name, is an exciting proposition for PC enthusiasts. Finally, after many years of struggle AMD has come up with a range of CPUs that can go toe-to-toe with Intel’s best. Built to be considerably more efficient than anything else AMD has released before, the Ryzen series runs faster and performs better than anything we’ve seen from the firm so far.

What you need to know

Case in point, the flagship Ryzen Threadripper 1950X, which is found at the heart of Alienware’s appropriately named Area 51 Threadripper Edition PC. This is full-bore CPU power: it’s a 180W CPU with 16 physical cores and 32 threads, runs at a base clock speed of 3.4GHz and a boosted, maximum clock speed of 4GHz and is equivalent to Intel’s hyperthreaded Core i9-7960X.

For your money (and it’s a lot, see below), the Area 51 Threadripper Edition backs that up with 64GB of fast DDR4 RAM and a pair of Nvidia GeForce GTX 1080 Ti graphics cards. As for storage, there’s a 1TB M.2 PCIe SSD, paired with a 2TB hard disk. A great balance of performance and capacity, this speedy SSD allows for fast booting and quicker software load times, while the sizeable hard disk gives you double the storage space for larger files.

Price and competition

Alienware’s Area 51 Threadripper Edition PC doesn’t come cheap, though. Configurations start at £2,149 for the Ryzen Threadripper 1900X-equipped model, with 8GB of DDR4 RAM and a single Nvidia GeForce GTX 1050Ti. The top-end model, which I was sent for review, will set you back £5,299.

Ludicrous, but direct competition is in short supply. The Area 51 is the only pre-built gaming PC being made today equipped with AMD’s high-core count processors. Yes, you can pick up one of these top-end processors from almost any PC components retailer, but no other manufacturer – not HP, Acer or Asus – offers a similar package.

Regardless, the pinnacle of what you can get with “mainstream” parts – that is a top-specced Ryzen 7, with an Nvidia GTX 1080 TI – will set you back £2,150.

Design, ports and connections

It may be similar to the 2014 original but that’s not to say the Area 51’s looks have faded. Its Blade Runner-esque chassis, which looks a bit like the cross-section of a giant, futuristic Toblerone is still as eye-catching as ever and looks great plonked on any desk. You will need a big desk, with sturdy legs, though, because the Threadripper weighs a not-inconsiderable 28kg and measures a monstrous 570 x 639 x 273mm (WDH).

Inside, all of the components sit at a 50-degree angle, to help boost airflow with cool air passing through the front and exiting at the rear. This fancy design doesn’t get in the way either, simply lift off either side panel and you can access all of the internal components.

On the outside, you get a good selection of connection ports, including nine USB 3.1 ports (seven at the back and two at the front), two USB 2.0 ports, one USB Type-C port and two Gigabit Ethernet ports. There’s also an SD card reader and optical DVD drive on the front.

As for display outputs, you’ll find one HDMI port, complete with a dual-link DVI and DisplayPort. And, on another happy note, there is extra room for three 3.5in storage drives, and one 2.5in drive, along with a spare PCIe 4x and PCIe 16x slot.

Performance

Of course, we’re most interested in how AMD’s Ryzen Threadripper 1950X CPU performs. It’s good news, at least according to our 4K application benchmarks, where the Area 51 wiped the floor with pretty much everything else we’ve ever tested.

It returned an image test score of 68; it also performed well in the video encoding test, scoring 241, and came out with 262 in the multitasking benchmark and 451 overall. Nothing else has come close.

Still, £5,300 is no small sum of money, so it’s fair to expect a PC with unrivalled gaming capability as well. Thankfully, Alienware’s latest monster more than delivers on this front as well.

Running Metro: Last Light Redux at ‘Very High’ graphics settings delivered an average frame rate of 109fps at 4K resolution. Tinker with some of the other graphics settings, like anti-aliasing and advanced physics effects and you’ll see a drop in performance, but I never saw it drop below an average of 70fps. Reduce the resolution to Full HD and you’ll see upwards of 114fps.

That’s no surprise, Nvidia’s GTX 1080Ti is very much a high-end graphics card and although it’s not the fastest GPU in Nvidia’s range (that mantle falls upon the Titan Xp), it’s definitely still in the upper echelons. With two in place, it’s hardly surprising not much can faze it.

Likewise, the Area 51 is a storming VR gaming machine. The Steam VR Performance Test – a necessary benchmark for any VR-capable PC – returned a score of 11, indicating that the hardware can run everything maxed-out at above 90fps. L.A. Noire: The VR Case Files ran without a hitch, and I was interrogating bad guys and engaging in high-speed car chases on our test HTC Vive without a single dropped frame.

The only potential issue is noise. While the Area 51 runs perfectly quiet for the most part, the front intake fan does drone on rather loudly, especially when you’re taxing the CPU and GPU at the same time.

Verdict

Unrivalled performance and brand-spanking new components mean Alienware’s Area 51 Threadripper Edition is an unbeatable gaming PC and the perfect showcase for AMD’s new high-core count Ryzen processors.

At £5,299 I’m hard-pressed to find any real reason for recommendation, however. Despite the fact that it’s an alarmingly high-calibre machine, spending upwards of five grand on a PC, no matter how impressive it is, feels ridiculous, especially considering you can build a decent 4K-capable gaming PC for half the price, if not less.

Regardless, if you absolutely must spend that inheritance money on a beast of a gaming PC, there’s no better way to burn your cash than the Dell Alienware Area 51 Threadripper Edition. For pity’s sake, though, do make sure to pop it on your home insurance.

(expertreviews.co.uk, https://goo.gl/UwMceD)


Acer Predator Helios 300 (15″) vs Dell Inspiron 15 7577 – what are the differences?

$
0
0

This article aims to distinguish Acer Predator Helios 300 (15″) from Dell Inspiron 15 7577.

Starting off with their hardware options, both notebooks sport 7th generation Intel Core processors. However, the Acer representative comes with the full version of the NVIDIA GeForce GTX 1060, while its competitor features NVIDIA GeForce GTX 1060 Max-Q which is slightly less powerful, as well as NVIDIA GeForce GTX 1050 and 1050 Ti GPUs. In addition, Dell Inspiron 15 7577 offers a larger amount of memory at up to 32GB of DDR4-2133 RAM.

In terms of display options, both laptops accommodate 15.6-inch IPSpanels with Full HD (1920 x 1080) resolution but Dell Inspiron 15 7577 also comes with a 4K UHD (3840 x 2160) one. The differences in the overall dimensions are not so extreme, however, the Dell device is slightly thinner at 24.95 mm and 50 grams less heavy, tipping the scale at 2.65 kg (5.8 lbs). Construction-wise, both devices feature aluminum for their chassis.

And finally, Dell Inspiron 15 7577 boasts a single USB 3.1 Type-C that supports Thunderbolt 3 which its rival lacks.

Specs sheet

Series
  • Acer Predator Helios 300 (15″)
  • Dell Inspiron 15 7577
OS
  • Windows 10
  • Windows 10
CPU
  • Intel Core i7-7700HQ
  • Intel Core i7-7700HQ
  • Intel Core i5-7300HQ
RAM
  • up to 16 GB of DDR4-2133 RAM
  • up to 32 GB of DDR4-2133 RAM
Internal storage
  • HDD/SSD
  • 2280 PCIe NVMe
GPU
  • NVIDIA GeForce GTX 1060 (6GB GDDR5)
  • NVIDIA GeForce GTX 1060 Max-Q (6GB GDDR5)
  • NVIDIA GeForce GTX 1050 Ti (4GB GDDR5)
  • NVIDIA GeForce GTX 1050 (4GB GDDR5)
Display
  • 15.6”, Full HD (1920 x 1080), IPS
  • 15.6”, Full HD (1920 x 1080), IPS
  • 15.6”, 4K UHD (3840 x 2160), IPS
Connectivity  802.11ac, 2×2 MIMO (Dual-Band 2.4GHz / 5GHz)
Bluetooth 4.0
Wi-Fi 802.11ac
Bluetooth 4.2
Features
  • 2x USB 2.0 Type-A
  • 2x USB 3.0 Type-A
  • HDMI
  • SD card reader
  • 3.5mm audio jack
  • Security Lock slot
  • 3x USB 3.0 Type-A
  • 1x USB 3.1 Type-C, Thunderbolt 3
  • HDMI
  • SD card reader
  • audio jack
  • Security Lock slot
Battery
  • 3220 mAh, Li-ion, 4-cell
  • 56Wh, Li-ion, 4-cell
Weight 2.70 kg (6 lbs) 2.65 kg (5.8 lbs)

All Acer Predator Helios 300 (15″) configurations

Acer Predator Helios 300 (G3-571) – $1049.99
  • Intel Core i7-7700HQ
  • NVIDIA GeForce GTX 1060 (6GB GDDR5)
  • 256GB SSD
  • 16GB RAM
Acer Predator Helios 300 – $1335.99
  • Intel Core i7-7700HQ
  • NVIDIA GeForce GTX 1060 (6GB GDDR5)
  • 1000GB HDD + 256GB SSD
  • 12GB RAM
Acer Predator Helios 300 – $1359.99
  • Intel Core i7-7700HQ
  • NVIDIA GeForce GTX 1060 (6GB GDDR5)
  • 1000GB HDD + 256GB SSD
  • 16GB RAM

All Dell Inspiron 15 7577 configurations

Dell Inspiron 15 7577 – $899.00
  • Intel Core i5-7300HQ
  • NVIDIA GeForce GTX 1060 Max-Q (6GB GDDR5)
  • 1000GB HDD + 128GB SSD
  • 8GB RAM
Dell Inspiron 15 7577 – $939.99
  • Intel Core i5-7300HQ
  • NVIDIA GeForce GTX 1060 Max-Q (6GB GDDR5)
  • 1000GB HDD + 128GB SSD
  • 8GB RAM
Dell Inspiron 7577 – $999.00
  • Intel Core i5-7300HQ
  • NVIDIA GeForce GTX 1060 Max-Q (6GB GDDR5)
  • 256GB SSD
  • 8GB RAM

(laptopmedia.com, https://goo.gl/yPu9WD)

Acer Aspire 7 (A717-71G) review – Acer’s high-performance mid-ranger

$
0
0
Pros
  • Good build quality with brushed aluminum
  • Nice keyboard, usable touchpad
  • Excellent, bright IPS panel with wide sRGB and high contrast
  • The display doesn’t use PWM for regulating brightness
  • Good price/performance ratio
  • Quiet and effective cooling system even during heavy workload
  • Decent web browsing runtimes
Cons
  • Short video playback runtimes
  • No keyboard LED backlight

Along with the Aspire 5 series release, Acer outed a more performance-focused version named Aspire 7 that runs on Intel’s quad-core Kaby Lake-H processors and sports a decent GTX 1050 GPU, which is enough for casual to moderate gaming. There are also few notable changes in the chassis compared to the Aspire 5 – brushed aluminum is the main material used making it feel a bit more robust and interestingly, the keyboard feels slightly altered as well.

Although it may seem like the Aspire 7 is made for gaming, judging by the specs sheet, the notebook isn’t marketed as gaming-oriented by the OEM nor does it feature the usual flashy appearance with red accents or a gaming-optimized keyboard. In any case, the Aspire 7 seems like a great choice if you are looking for an affordable 17-inch high-performance laptop that’s also able to drive most of the games in low to medium graphics settings. We would like, however, to see how it performs in other areas like battery endurance, screen quality and temperature handling.

Retail package

The retail package contains all the usual user manuals, AC adapter and power cord – nothing out of the ordinary.

Design and construction

As we already mentioned, the Aspire 7 and the Aspire 5 share some similarities like general appearance and overall portability. Just like the Aspire 5, the Aspire 7 isn’t the lightest laptop out there but manages to keep the weight under 3.0 kg (2.9 kg to be exact).

Not that bad for a 17-incher to be honest. Its thickness, though, isn’t as impressive – measuring at around 27 mm, we can definitely put the machine in the “slightly bulky” category but we hope the cooling system will benefit from this.

The most notable change here compared to the Aspire 5 is the lid. Now featuring brushed aluminum sheet, the laptop feels a bit more rigid in the middle, isn’t susceptible to severe twisting but the bottom chin still feels a bit flexible due to the hinges being placed too far apart leaving the middle of the screen without any support.

Speaking of the hinges, they feel a bit overly tightened and don’t allow opening the machine with just one hand. As for the bottom, it continues to use the slightly roughened plastic with some grills for dispersing the heat and two service hatches for easy access to the 2.5-inch HDD and RAM sticks. We’ve also noticed something quite irritating – the left edge under the palm rest area wobbles even when placed on an even surface – it must be due to the unbalanced base or the silicone leg is just a tad shorter on the right. Either way, it might not be an issue with all the units out there.

Moving on to the sides, we see the standard I/O configuration, which appears to be well-distributed – the left side holds most of the connectors like RJ-45 for LAN, USB-C 3.1 (Gen 1), HDMI, USB 3.0 and the SD card reader. The right side comes with the DC charging port, two USB 2.0 connectors and the 3.5 mm audio jack.

Opening the lid reveals a familiar Acer design that we’ve already seen in several other notebooks. The brushed aluminum interior is still a fingerprint magnet but serves as a fairly stable construction. Only the area around the touchpad appears to be bending just a little but nothing too serious in our opinion. Besides, this is a budget-oriented laptop anyway. While we are on the touchpad, let’s just say it’s identical to the one on the Aspire 5 – surrounded by chamfered edges, has smooth gliding surface, it’s fairly responsive and features light and clicky mouse clicks. And as for the keyboard, well we’ve noticed a small but notable change compared to the cheaper Aspire 5.

The keycaps still come with that slightly concaved surface for optimum typing comfort and provide that light but clicky tactile feedback. However, we can definitely feel the increased key travel while typing compared to the Aspire 5. The latter’s keys felt somehow “dull”. Still, the arrow keys aren’t really that comfortable for gaming but this isn’t marketed as “strictly gaming laptop” anyway.

The Aspire 7 seems like a well-made 17-incher with much fewer compromises than we would have expected, especially given the price tag. We also liked the keyboard and the touchpad, which often left neglected in these type of notebooks.

Disassembly, maintenance and upgrade options

The disassembly process and upgrade options are absolutely identical to the Aspire 5 (17-inch) – there are two small service covers for the 2.5-inch drive and one for the memory slots. But if you wish to access the rest of the internals, you will have to dig deeper by removing the whole bottom piece.

Storage upgrades – 2.5-inch HDD/SSD, M.2 SSD

The unit we’ve tested came with just one 2.5-inch HDD from Toshiba with 1TB capacity but thanks to the M.2 SSD slot, the storage can be expanded. The M.2 slot supports PCIe NVMe-enabled drivers coming in 2280 standard.

Slot Unit  
2.5-inch HDD/SSD slot 1TB Toshiba HDD
M.2 SSD 2280 slot 1 Free
RAM

The motherboard holds two memory slots and both can be accessed via the small service hatch. Each slot supports up to 16GB of DDR4-2400 chips but our unit came with just one 8GB Kingston stick.

Slot Unit
Slot 1 8GB Kingston DDR4-2400
Slot 2 Free
Other components

The Wi-Fi card is placed near one of the cooling fans and it’s Qualcomm QCNFA344A.

The battery is rated at 48Wh and it’s placed under the wrist rest area.

Cooling system

Although the cooling design doesn’t seem all that reliable because we’ve seen other laptops with the same layout – both cooling fans stuck together and just two small heatpipes connecting the CPU and GPU heatsinks and sharing the heat. However, probably due to the “lightweight” hardware, the system was able to cool things off quite easily.

Display quality

It appears that the current Full HD (1920×1080) IPS panel can be found in a long list of laptops – Acer Aspire 5 (17-inch), ASUS ROG Strix GL703VM, ASUS ROG Strix GL702ZC and Lenovo’s Legion Y920. So we already know what to expect from the display. Anyway, it provides 127 ppi pixel density and 0.1995 x 0.1995 mm pixel pitch. The screen can be considered as “Retina” when viewed from at least 69 cm.

Viewing angles are excellent.

WE’ve recorded a peak brightness of 420 cd/m2 in the center and 404 cd/m2 as average across the surface with 10% maximum deviation. The correlated color temperature is a little colder than the optimal (6500K) – 7220K. As we go along the grayscale, the color temperature falls down a little – 7220K but still a bit colder than it should be. You can see how these values change at 140 cd/m2 (28% brightness).

The relative dE2000 (color deviation) compared to the center of the screen shouldn’t be more than 4.0 if you are planning on using the screen for color-sensitive work. The contrast ratio is excellent a well – 1000:1.

Color reproduction

To make sure we are on the same page, we would like to give you a little introduction of the sRGB color gamut and the Adobe RGB. To start, there’s the CIE 1976 Uniform Chromaticity Diagram that represents the visible specter of colors by the human eye, giving you a better perception of the color gamut coverage and the color accuracy.

Inside the black triangle, you will see the standard color gamut (sRGB) that is being used by millions of people in HDTV and on the web. As for the Adobe RGB, this is used in professional cameras, monitors etc for printing. Basically, colors inside the black triangle are used by everyone and this is the essential part of the color quality and color accuracy of a mainstream notebook.

Still, we’ve included other color spaces like the famous DCI-P3 standard used by movie studios, as well as the digital UHD Rec.2020 standard. Rec.2020, however, is still a thing of the future and it’s difficult for today’s displays to cover that well. We’ve also included the so-called Michael Pointer gamut, or Pointer’s gamut, which represents the colors that naturally occur around us every day.

As expected, the sRGB coverage is 89% ensuring good multimedia and gaming experience.

Our “Design and Gaming” profile delivers optimal color temperature (6500K) at 140 cd/m2 luminance and sRGB gamma mode.

We tested the accuracy of the display with 24 commonly used colors like light and dark human skin, blue sky, green grass, orange etc. You can check out the results at factory condition and also, with the “Design and Gaming” profile.

The next figure shows how well the display is able to reproduce really dark parts of an image, which is essential when watching movies or playing games in low ambient light.

The left side of the image represents the display with stock settings, while the right one is with the “Gaming and Web Design” profile activated. On the horizontal axis, you will find the grayscale and on the vertical axis – the luminance of the display. On the two graphs below you can easily check for yourself how your display handles the darkest nuances but keep in mind that this also depends on the settings of your current display, the calibration, the viewing angle and the surrounding light conditions.

Response time (Gaming capabilities)

We test the reaction time of the pixels with the usual “black-to-white” and “white-to-black” method from 10% to 90% and reverse.

We recorded Fall Time + Rise Time = 23 ms.

PWM (Screen flickering)

Pulse-width modulation (PWM) is an easy way to control monitor brightness. When you lower the brightness, the light intensity of the backlight is not lowered, but instead turned off and on by the electronics with a frequency indistinguishable to the human eye. In these light impulses, the light/no-light time ratio varies, while brightness remains unchanged, which is harmful to your eyes. You can read more about that in our dedicated article on PWM.

The screen doesn’t use PWM – only some extremely high-frequency pulsations appear at times.

Blue light emissions

Installing of our Health-Guard profile not only eliminates PWM but also reduces the harmful Blue Light emissions while keeping the colors of the screen perceptually accurate. If you’re not familiar with the Blue light, the TL;DR version is – emissions that negatively affect your eyes, skin and your whole body. You can find more information about that in our dedicated article on Blue Light.

You can see the levels of emitted blue light on the spectral power distribution (SPD) graph.

Conclusion

As we already stated in the Aspire 5 review, we are extremely happy with the display quality as it provides all of the essentials for a good gaming and multimedia experience. It has high maximum brightness, wide sRGB coverage, good contrast and lacks PWM. Easily, the Aspire 7 puts to shame most of the 17-inch laptops out there.

Sound

The loudspeakers provide clean reproduction of the low, mid and high frequencies without any noticeable distortions.

Specs sheet

The current specs sheet is for this particular model and configurations may differ depending on your region

Acer Aspire 7 A717-71G technical specifications table - Also known as Acer Aspire 7 (A717-71G)

Acer

CPU : Intel Core i5-7300HQ
GPU : NVIDIA GeForce GTX 1050 (2GB GDDR5)
Display : 17.3”, Full HD (1920 x 1080), IPS
HDD/SSD : 1TB HDD, 5400 rpm
M.2 Slot : 1x PCIe NVMe M.2 slot (2280, M-key)
RAM : 8GB DDR4, 2400 MHz
Dimensions : 423 x 290 x 28.25 mm (16.65″ x 11.42″ x 1.11″)
Weight : 3.04 kg (6.7 lbs)
Body material : Plastic / Polycarbonate, Aluminum (Aluminum lid and interior, plastic base)
Ports and connectivity :
  • 1x USB Type-C : 3.0 (3.1 Gen 1)
  • 1x USB Type-A  : 3.0 (3.1 Gen 1), Sleep and Charge
  • 2x USB Type-A  : 2.0
  • HDMI : V
  • VGA : X
  • Card reader  : SD/SDXC card reader
  • Ethernet lan  : Gigabit Ethernet
  • Wi-Fi  : 802.11a/b/g/n/ac; 2.4 Ghz / 5 GHz; 2x2MIMO
  • Bluetooth  : 4.0
  • Audio jack : Headset/Speaker jack
Features : 
  • Fingerprint reader : V
  • Web camera : 720p HD
  • Backlit keyboard : X
  • Microphone  : Dual digital Microphone
  • Speakers  : Two built-in stereo speakers
  • Optical drive : X
  • Security Lock slot : Kensington lock slot
Acer Aspire 7 (A717-71G) configurations

Acer Aspire 7 A717-71G – Not available

  • Intel Core i5-7300HQ
  • NVIDIA GeForce GTX 1050 (2GB GDDR5)
  • 1000GB HDD
  • 8GB RAM

Acer Aspire 7 A717-71G – Not available

  • Intel Core i5-7300HQ
  • NVIDIA GeForce GTX 1050 Ti (4GB GDDR5)
  • 1000GB HDD + 128GB SSD
  • 8GB RAM

Acer Aspire 7 – Not available

  • Intel Core i7-7700HQ
  • NVIDIA GeForce GTX 1060 (6GB GDDR5)
  • 1000GB HDD + 128GB SSD
  • 8GB RAM

Software

We used the pre-installed Windows 10 Pro for the writing of this review but if you wish to perform a clean install of the OS, we suggest downloading all of the latest drivers from Acer’s official support page.

Battery

Battery life isn’t exactly impressive but it’s a little above the average for a 17-inch high-performance notebook. It seems that the 48Wh charge of the battery keeps the system running for quite some time during web browsing but fails to impress when it comes to video playback away from the plug.

All tests were performed with the usual settings – Wi-Fi turned on, screen brightness set to 120 cd/m2 and Windows power saving mode turned on.

Web browsing

In order to simulate real-life conditions, we used our own script for automatic web browsing through over 70 websites.

Good web browsing score – 409 minutes (6 hours and 49 minutes).

Video playback

For every test like this, we use the same video in HD.

The video playback score is considerably lower – 288 minutes (4 hours and 48 minutes).

Gaming

We recently started using F1 2017’s built-in benchmark on loop in order to simulate real-life gaming.

This test got the most of the battery since it’s the most demanding one and surely, you won’t start a gaming session away from the power source but you can still squeeze 105 minutes (1 hour and 45 minutes) if needed.

CPU – Intel Core i5-7300HQ

ntel’s Core i5-7300HQ is part of the 7th Generation Kaby Lake CPUs and it’s the direct successor of the Core i5-6300HQ (Skylake). It’s also based on the same architecture as the aforementioned chip with little differences that should bring a small performance increase and a bump in power consumption. However, the new CPU is clocked at 2.5 GHz and its Turbo Boost frequency is 3.5 GHz opposed to the 2.3 – 3.2 GHz clocks on the previous Core i5-6300HQ.

We have the same 4/4 core/thread count 6MB last level cache, a TDP of 45W which includes the iGPU and the dual-channel DDR4 memory controller. Speaking of the former, the chip integrates the newer generation Intel HD Graphics 630 graphics chip clocked at 350 – 1000 MHz.

You can browse through our top CPUs ranking: http://laptopmedia.com/top-laptop-cpu-ranking/

Here you will find other useful information and every notebook we’ve tested with this processor: http://laptopmedia.com/processor/intel-core-i5-7300hq/

  • Cinebench 11 – Results are from the Cinebench 11 test (higher the score, the better)
Laptop Results Result
difference
Acer Aspire 7 A717-71G Intel Core i5-7300HQ (4-cores, 2.5 – 3.5 GHz) 5.95
Dell Inspiron 7773 Intel Core i7-8550U (4-cores, 1.80 – 3.7? GHz) 7.53 +26.55%
Acer Aspire 5 (A517-51G) Intel Core i7-8550U (4-cores, 1.80 – 3.7? GHz) 5.78 -2.86%
  • NovaBench CPU – Results are from the NovaBench CPU test (higher the score, the better)
Laptop Results Result
difference
Acer Aspire 7 A717-71G Intel Core i5-7300HQ (4-cores, 2.5 – 3.5 GHz) 515
Dell Inspiron 7773 Intel Core i7-8550U (4-cores, 1.80 – 3.7? GHz) 959 +86.21%
Acer Aspire 5 (A517-51G) Intel Core i7-8550U (4-cores, 1.80 – 3.7? GHz) 928 +80.19%
  • Photoshop – Results are from the Photoshop test (lower the score, the better)
Laptop Results Result
difference
Acer Aspire 7 A717-71G Intel Core i5-7300HQ (4-cores, 2.5 – 3.5 GHz) 12.87
Dell Inspiron 7773 Intel Core i7-8550U (4-cores, 1.80 – 3.7? GHz) 9.95 -22.69%
Acer Aspire 5 (A517-51G) Intel Core i7-8550U (4-cores, 1.80 – 3.7? GHz) 11.01 -14.45%
Fritz

Fritz is a chess benchmark that tests the computing capabilities of the CPU with various chess moves. The Intel Core i7-8550U managed to get 9.858 million moves per second. For comparison, one of the most powerful computers, Deep(er) Blue, was able to squeeze out 200 million moves per second. In 1997 Deep(er) Blue even beat the famous Garry Kasparov with 3.5 to 2.5.

GPU – NVIDIA GeForce GTX 1050 (4GB GDDR5)

The GeForce GTX 1050 GPU for laptops is part of the latest NVIDIA Pascal lineup of GPUs featuring a brand new architecture design but on contrary to the rest of the GPUs from NVIDIA’s lineup, the GTX 1050 and 1050 Ti feature a Samsung-made FinFET 14nm chip instead of the TSMC 16nm found in the GTX 1060, 1070 and 1080. The graphics card is based on the GP107 chip paired with 4GB of GDDR5 memory via 128-bit interface.

Since the GTX 1050 is quite dependent on the cooling design, its performance may vary but if the laptop handles the GPU well and shouldn’t be much different from its desktop counterpart. Anyway, the GPU operates at relatively high frequencies (1354 – 1493 MHz) but incorporates the same amount of CUDA cores (640) while the memory is clocked at 7000 MHz (effective). These specs ensure a huge performance boost over the previous generation of Maxwell GPUs. For instance, the GTX 1050 performs better than the GTX 960M and can be compared to the GTX 965M’s capabilities while running at similar to the GTX 960M’s TDP of around 40-50W.

However, along with all the power consumption and performance improvements, the GPU now supports essential features like DisplayPort 1.4, HDMI 2.0b, HDR, improved H.265 encoding, and decoding.

You can browse through our top GPUs ranking: http://laptopmedia.com/top-laptop-graphics-ranking/

Here you will find other useful information and every notebook we’ve tested with this GPU: http://laptopmedia.com/video-card/nvidia-geforce-gtx-1050-4gb-gddr5/

  • 3DMark Cloud Gate (G) – Results are from the 3DMark Cloud Gate (G) test (higher the score, the better)
Laptop Results Result
difference
Acer Aspire 7 A717-71G NVIDIA GeForce GTX 1050 (2GB GDDR5) 38345
Dell Inspiron 7773 NVIDIA GeForce MX150 (2GB GDDR5) 19708 -48.6%
Acer Aspire 5 (A517-51G) NVIDIA GeForce MX150 (2GB GDDR5) 15528 -59.5%
  • 3DMark Fire Strike (G) – Results are from the 3DMark Fire Strike (G) test (higher the score, the better)
Laptop Results Result
difference
Acer Aspire 7 A717-71G NVIDIA GeForce GTX 1050 (2GB GDDR5) 5959
Dell Inspiron 7773 NVIDIA GeForce MX150 (2GB GDDR5) 3381 -43.26%
Acer Aspire 5 (A517-51G) NVIDIA GeForce MX150 (2GB GDDR5) 3566 -40.16%
  • Unigine Heaven 3.0 – Results are from the Unigine Heaven 3.0 test (higher the score, the better)
Laptop Results Result
difference
Acer Aspire 7 A717-71G NVIDIA GeForce GTX 1050 (2GB GDDR5) 1794
Dell Inspiron 7773 NVIDIA GeForce MX150 (2GB GDDR5) 979 -45.43%
Acer Aspire 5 (A517-51G) NVIDIA GeForce MX150 (2GB GDDR5) 1081 -39.74%

GTA-V-benchmarks

Grand Theft Auto V (GTA 5) Full HD, Low (Check settings) Full HD, Medium (Check settings) Full HD, Very High (Check settings)
Average FPS 99 fps 62 fps 34 fps

rise-of-the-tomb-raider

Rise of the Tomb Raider (2016) Full HD, Low (Check settings) Full HD, Medium (Check settings) Full HD, Very High (Check settings)
Average FPS 75 fps 50 fps 23 fps

Tom Clancy’s Ghost Recon Wildlands Full HD, Medium (Check settings) Full HD, High (Check settings) Full HD, Very High (Check settings)
Average FPS 39 fps 34 fps 27 fps

Temperatures

The stress tests that we perform don’t represent real-life use since even the most demanding games don’t require 100% CPU and GPU load for such long periods of time. However, it’s still the most reliable way to assess the overall effectiveness and stability of the cooling system.

We started off with 100% CPU load for about an hour only to see that the system utilizes the full performance of the processor without any issues.

Turning on the GPU stress test didn’t change things too much – the Core i5-7300HQ ran stable at 3.1 GHz while the GTX 1050 was running at frosty 67 °C while utilizing the full performance of the chip – 1670 MHz. To be honest, we were pretty surprised by the results because the current cooling design has proven to be ineffective in all of the laptops we’ve tested so far. But our best guess is that the Core i5-7300HQ and the GTX 1050 aren’t so demanding and even this cooling design is enough to keep things cool and under control. In any case, we are extremely happy with the temperatures.

Even external temperatures didn’t show any signs of overheating and more importantly, we noticed that the fans ran pretty silent considering the extreme nature of the stress test.

Verdict

We were happy with the Acer Aspire 5 (17-inch model) and we are also extremely satisfied with the Aspire 7 as well. For the incremental increase in price, the Aspire 7 offers a significant upgrade not only in the hardware department but in terms of build quality as well. The aluminum lid and interior are hard to come by in this class, especially with a powerful hardware like this one. In addition, the keyboard and the touchpad feel way better than the ones we saw in the Aspire 5. The only thing missing here is the LED keyboard illumination. Also, the layout isn’t really gaming-centric but to be fair, Acer never claimed it’s a gaming-oriented laptop in the first place.

Despite the obvious bang for the buck configuration here (quad-core Core i5 + GTX 1050), the device surprises with excellent IPS display a well. Using the same panel as the Aspire 5 and other considerably more expensive gaming machines like the ASUS ROG GL702VM and the Lenovo Legion Y920, the 17-inch Aspire 7 is an ideal choice for multimedia and gaming on a budget. The LG screen is bright, has wide sRGB coverage, good contrast and doesn’t use PWM for regulating brightness.

Of course, like with most performance 17-inch laptops, battery life isn’t amazing but it will last a few hours away from the plug when it comes to web browsing. Don’t expect too much for video playback, though. A more important aspect, in which the Aspire 7 excels, however, is the cooling design. According to our extensive stress tests, the cooling system can handle a lot of torture without breaking a sweat – the CPU and GPU will run cool most of the time while keeping noise emissions to a minimum. It came as a surprise because the design proved to be inefficient when paired with more powerful GTX 1050 Ti/GTX 1060 and Core i7-7700HQ.

To be fair, it’s really hard not to recommend this high-performance budget laptop. It’s good for everyday work, for multimedia and even for gaming while costing just around €750 (since at the time of writing this review, the Aspire 7 is still not available in the US). But if all that power isn’t all that necessary, we recommend looking into the Aspire 5 as well as it offers just about the same user experience but with more balanced hardware capable of squeezing out better battery runtimes.

(laptopmedia.com, https://goo.gl/A6LxZP)

HP Spectre x360 13t (late 2017) review: An 8th-gen CPU leads a raft of upgrades

$
0
0
Pros
  • Thin, light and powerful
  • 8th gen Core i7
  • Supports external graphics
Cons
  • Trackpad is a tad wide
  • Can get a tad hot under load

dsc00026 edited 1

Packing a quad-core 8th-gen Core i7 and a ton of improvements, this is easily the best convertible laptop you can buy today.

HP’s Spectre x360 proves that HP doesn’t like to sit still. While some companies show up to the dance in the same outfit over and over again (looking at you, MacBook Air 13 and Dell XPS 13), HP has revamped its premium 2-in-1 over and over again—no fewer than three times in the last two years, in fact.

dsc00005 edited 1

In this latest and third version of the Spectre x360 13t, HP didn’t just jam in an 8th-gen quad-core Core i7 and call it an upgrade. It’s also given the entire laptop a significant refresh—one that addresses almost every quibble we’ve had with prior versions. This should give the MacBook Air 13 and the Dell XPS 13 yet another reason to worry.

dsc00032 edited 1

HP wasn’t content to sit still with its excellent Spectre x360 13t.

A short history

The Spectre x360’s evolution to this point has been complex. The first iteration of the Spectre x360 was beautifully built from CNC aluminum, but it ran on heavy side. Next to the diminutive XPS 13, it looked giant.

HP’s second generation went on a diet. In fact, the Spectre x360 13t was so good, it convinced some of us there was no point in Microsoft’s Surface Pro line anymore. We found that with the Surface and its clones, we used it in tablet mode maybe five percent of the time. For that little-used tablet mode, we give up a lot in lapability. The Spectre x360 13t demanded no such sacrifice.

hp spectre x360 hinge

It may look similar, but the third-gen (late 2017) Spectre x360 13T (top) features more squared-off lines compared to the previous generation.

The HP Spectre x360 may already be our favorite convertible, but HP has still managed to make it better both inside and out. The original Spectre x360 13t’s face recognition was good, but we always found Microsoft’s Surface Book implementation to be slightly faster. On this new third generation, the Windows Hello support seems to have caught up with the Surface Book’s.

For paranoid types who like to cover up the camera, HP now includes a strip fingerprint reader on the side. Don’t worry, this isn’t the old swiper-style reader—it works much better—and it lets you easily unlock the laptop.

Prices, features, and specs

HP offers many options for the Spectre x360, including screens from 1080p to 4K, and even a privacy screen option. RAM varies from 8GB to 16GB, and the SSD options ranges from 256GB to 1TB. Our particular model features a Core i7-8550U, 8GB of RAM, a 1080P touch/pen panel and a 2565GB SSD for $1,099. That’s an extremely competitive price for the included hardware. Keep reading for a detailed rundown of the configuration and its highlights.

dsc00028 edited 1

The Spectre x360 13t now includes a fingerprint reader on the side. Clever.

CPU: Intel 8th-gen quad-core Core i7-8550U. This is Intel’s latest chip technology, which delivers a dramatic boost in performance on multi-threaded work loads. HP also sells a version of the Spectre x360 with the 8th-gen Core i5 CPU, and it doesn’t give up much in performance. To save a bit on cost, consider that one.

RAM: 8GB of LPDDR3/2133. While 16GB would be nice, for 90 percent of us, 8GB is fine.

Storage: 256GB Samsung PM961 NVMe SSD. In today’s world, 256GB of storage is a little tight—we’d prefer 512GB, or even the 1TB version HP offers. Assuming you don’t load up the Spectre x360 with every picture and video in your world, however, 256GB is plenty.

Display: 1920×1080 IPS touchscreen with active pen support. We were generally pleased with the IPS touch screen and its Corning Gorilla glass layer. On battery, however, we noticed that the brightness dropped to about 255 nits max, whereas on AC it was able to hit 295 nits.

Pen: Our review unit came with the N-trig based HP Tilt Pen. It has two nifty features. First: no more batteries. Like most users, you only find out your pen is dead when you need it the most. And, no, even Radio Shack Battery Club members won’t have a AAAA cell around. The HP Active stylus slides open to reveal a hidden USB-C port to charge it up.

The pen also supports a Presentation mode that lets you use it to scroll down and control the cursor, or flip through a PowerPoint by waving the pen in the air.

2017 12 20 12.06.24

No more hunting for AAAA (yes, quad A) batteries at a Radio Shack: The new HP Active Stylus recharges using a hidden USB-C connector. 

Keyboard and trackpad: The keyboard and trackpad haven’t changed much from what we can tell. Generally, we like the large keys and long travel. One thing we’ve never gotten used to is the location of the home, page up, page down and end buttons on the far right. Maybe we’re sloppy typers, but we’d hit those keys mistakenly on occasion while typing at full speed.

The wide-aspect-ratio trackpad (from Synaptics is also something we’ve had issues with in the past. It’s a good trackpad, but the size meant we’d have to crank up the palm rejection to prevent errant cursor moves.

hp spectre x360 kb

The keyboard tray is resculpted on the new HP Spectre x360 13t (left) vs. the previous generation (right).

Ports: New this year is a MicroSD card slot. You get two Thunderbolt 3 ports that both support charging over USB-PD, as well as (thank you!) a USB Type A port. No matter what you think of a PC maker, we should all take a moment to loudly thank any that include at least one Type A port on ultraportable laptops.

If you’re wondering whether you can run external graphics over the Thunderbolt 3 ports, you can. HP has actually led the way on supporting external graphics over Thunderbolt 3 ports. In fact, the company even offers a version of the Spectre x360 with an external graphics cabinet.

hp spectre x360 left side

The new HP Spectre x360 13t (top) now includes a MicroSD card port.

Dimensions: The latest Spectre x360 13t measures in at 12 x 8.6 x 0.53 inches. Amazingly the weight of the Spectre x360 13t is lighter than before. Our postage scale put the Spectre at 2 pounds, 11.7 ounces. That’s an ounce or so lighter than the previous model. The new model includes a more powerful 65-watt USB-PD/C power brick, which takes the total package up to 3 pounds, 4.7 ounces.

Performance

The big story with the Spectre x360 13t is the upgrade in performance by moving from a 7th-gen Core i7 to an 8th-gen Core i7. The question with any super-thin convertible, though, is whether it’ll throw performance overboard when things get hot.

Our first test was Maxon’s Cinebench R15. It’s a near-pure CPU test that measures how fast a computer can render a 3D image. While 3D rendering isn’t what most would ever do on an ultraportable, it is a good way measure performance.

We first look at the load spread among all of the CPU cores available. Overall performance is quite good, although the convertible nature and its thinner profile put it behind Dell’s XPS 13. That’s no surprise: Laptops that can be converted to tablets typically must run cooler. The Spectre x360 13t does ace the even thinner Spectre 13, though.

The important comparison is to the earlier 7th-gen Core i7 XPS 13 and Spectre x360 laptops. There we see the 8th-gen laptops prevail in multi-threaded performance.

hp spectre x360 13t cinebench nt

The Spectre x360 13t gives some quarter to its rival, the Dell XPS 13, but that’s to be expected with the laptop-only form factor of the Dell.

The vast majority of the world doesn’t run on multi-threaded code, though, so for our second text we set Cinebench R15 to render the image using a single core. The results put the XPS 13 and the Spectre x360 13t dead even, but the results also tell us that for the most part, you won’t be able to feel much of a difference between a 7th-generation Core i7 and a 8th-gen Core i7 in single-threaded tasks.

hp spectre x360 13t cinebench 1t

In most single-threaded applications, you’re unlikely to “feel” the difference between a a 7th-gen Core i7 and an 8th-gen Core i7.

Don’t believe us? We also ran PCMark 8 Work Conventional, which, simulates typical office tasks. It reinforces what we saw with Cinebench R15 in single-threaded tasks. For the most part, a typical person doing a typical thing won’t see a difference.

hp spectre x360 13t pcmark work convetional

PCMark 8 Work puts most of the Core i7 laptops at the same level because most boring apps won’t exploit all those cores of the 8th gen CPU.

Still, there is an argument for more cores if you do things that need it. Our last CPU test uses Handbrake 0.9.9 to encode a 30GB 1080P MKV file using the default Android Tablet preset. This test favors more cores, and we see the Spectre x360 13t leave its predecessor miles behind. Basically, if you do intend to do heavier tasks such as video editing, encoding and advanced photo editing (using multi-threaded apps), the 8th-gen Spectre x360 13t doesn’t disappoint.

If you’re wondering why the Dell XPS 13 is in front, it’s due to the laptop-only design, the thicker body and possibly better cooling. It’s not the Spectre x360 13t’s fault—there is a price to be paid for laptop that converts into a tablet.

hp spectre x360 13t handbrake

caption

Graphics performance

There’s not much to talk about in graphics, as most of these laptops use the same or very similar graphics chips inside. The laptop-only Dell enjoys a minor lead, but if you want “real” gaming, we recommend you pick up a Thunderbolt 3 graphics cabinet and go to town.

hp spectre x360 13t 3d mark sky diver overall

It’s pretty much a wash among the Core i7 chips, which all have very similar graphics chips.

Battery life

Our last result is from the most important one to most: battery life. To measure that, we loop a 4K video using Window’s built-in video player (it’s the best one for battery life.) This is done with Airplane mode enabled on the laptop and its display brightness set at about 250 to 260 nits, the brightness you’d need in a typical office or home. We also plug in ear buds with the volume set to a midrange level.

The results speak well for the HP Spectre x360 13t, with an excess of 12 hours of video playback. Remember: this is a video run down test. Running intensive tests, using a higher brightness or even browsing means your battery life will vary (more on this topic here.) Still, this is a good showing for the Spectre x360.

hp spectre x360 13t battery life

The Spectre x360 13t comes out on top in our battery run down test by a hair.

Conclusion

To really understand HP’s take on the Spectre x360 13t, you have to look at the little things. For example, the last iteration featured a side-mounted flush power button that often was difficult to find and press. This version’s button features a small dimple that makes it easy to locate by touch. A lot of companies might let those little things just roll on for another year or two, but not HP.

To think that since its introduction in 2015, HP has introduced no fewer than three major updates to the Spectre x360 13t (including four different CPU choices) while Apple and Dell have done business as usual says something.

It’s also easy to see why the Spectre x360 13t has been and will likely continue to be our favorite convertible. It is simply everything we liked about the previous one, with a whole lot more performance.

(pcworld.com, https://goo.gl/t2Jzbh)

Xiaomi ZMI 10 20000mAh Review : Powerbank for your Macbook

$
0
0

Powerbanks are pretty common these days but the ones that are capable of charging your MacBook are quite rare. So, when we chance upon this Macbook powerbank from Xiaomi, we bought it and tested it out. ZMI (pronounced as zi-mi) is a sub-brand under Xiaomi. This is actually the first time we saw this become available locally.

This is a large-capacity powerbank, rated at 20,000mAh. The body is made up of ABS with a matte finish (dark blue color) that feels like anodized aluminum and is quite hefty (402 grams) to carry around. There are 2 USB Type-A ports and a USB Type-C port on one end. There’s a charging indicator on one side and LED lights to indicate charge level.

It comes with two charging cables in the box — one Type-A to Type-C (with micro-USB adaptor) and another Type-C to Type-C cable.

All USB ports support Quick Charge 3.0 with the Type-C able to output 45W of power to drive your Macbook. You can charge a maximum of 3 devices at the same time with this.

The powerbank also doubles as a USB hub which can be very useful for MacBooks that only have Type-C ports. You can plug in a flash drive or even an external HDD into the powerbank while it’s connected to the Macbook and you can access all your files right thru the powerbank. You can even plug a wired mouse thru the hub.

What’s also nice about this is that it has bi-directional Quick Charge which means you get to re-charge the powerbank really quick as well (3-4 hours). You can even use your MacBook’s wall charger to recharge it.

The powerbank is a little bulky although the size is the same as your typical 6-inch smartphone (almost identical to the OnePlus 5T in width and length). It has a carrying case as well but this is really meant for stowing in your backpack and when traveling.

This is a really good powerbank for heavy users since it can re-charge almost any devices you’d like to carry around (smartphones, Nintendo Switch, Macbook, Sony cameras and more).

(yugatech.com, https://goo.gl/E2qXQJ)

MacBook Pro Thunderbolt 3 adapter guide: How to connect an iPhone, display, hard drive, and more

$
0
0

The new MacBook Pro comes with two or four external ports, depending on the model you pick. But those ports are only of one type: Thunderbolt 3, which is compatible with USB-C.

But you probably have devices that use USB-A, Thunderbolt 1, Thunderbolt 2, DisplayPort, HDMI, or something else. How do you connect these devices? With an adapter.

If you’re planning to buy a new MacBook Pro, make sure you set aside a considerable amount of cash for the adapters you need. Apple doesn’t include any in the box, except for a power adapter.

Kết quả hình ảnh cho MacBook Pro Thunderbolt 3

Your best bet is to get a combination dock, like the Satechi Slim Aluminum Type-C Multi-Port Adapter ($60 on Amazon). It connects to the MacBook Pro via USB-C, and includes a USB-C pass-through port, two USB 3.0 ports, and an HDMI port with 4K (30Hz) support. With this, you don’t have to carry around multiple adapters.

If you don’t want a dock, or you can’t find a dock with the mix of connections you need, Apple or another company probably has an adapter for you. We’ve come up with this guide to help you sort out what you need, and we link to the appropriate adapter in the online Apple Store or on Amazon. You can also use the quick link list below to jump to the info you need.

How to connect:

  • USB-C devices
  • USB-A devices
  • Micro USB devices
  • Micro B SuperSpeed USB
  • iPhone or iPad
  • Lightning Earpods
  • Headphones with a 3.5mm headphone plug
  • Thunderbolt 1 or Thunderbolt 2 devices
  • DisplayPort and mini DisplayPort
  • HDMI
  • DVI
  • VGA
  • ethernet
  • SD cards
  • FireWire devices
  • Printer with USB-B
  • MagSafe

Be sure to check the return policies; sometimes adapters from third-parties don’t work. Read user reviews whenever possible, and read the specifications to make sure the adapter can do what you need it to do.

If there’s a connection we missed, or you have advice on what adapters to buy, let us know on Twitter or Facebook.

How to connect USB-C devices

The Thunderbolt 3 ports in the MacBook Pro work with USB-C devices, which have the same connector shape. So if you want to use a USB-C device, you can just plug it into one of the Thunderbolt 3 ports. No adapter necessary. Whew.

How to connect USB-A devices

USB-A is the USB connector with which you’re probably most familiar. It’s the USB connector that was on the previous MacBooks, and it’s the connector that comes on your iOS device’s sync cable in the box. (Terms like USB 3 and USB 2 refer to the speed at which data travels through the connector.)

apple usb c to usb adapter

Apple USB-C to USB Adapter

This problem first came up when Apple released the 12-inch MacBook, which has a single USB-C port. You can get a dock, like the before-mentioned Satechi. Or you can get Apple’s $19 USB-C to USB Adapter.

If you need to connect multiple USB-A devices, get a USB-C to USB-A hub. Anker sells a USB-C to 4-Port USB 3.0 Hub ($18 on Amazon) that provides four USB-A ports.

How to connect micro USB devices

Devices like iPhone battery cases and some external hard drives use micro USB ports. To connect to the MacBook Pro, you can use an adapter like the Aukey USB C to Micro USB Adapter, which is available as a two-pack for $8 on Amazon.

Aukey USB C to Micro USB Adapter

Aukey USB C to Micro USB Adapter

How to connect micro B SuperSpeed USB devices

This connector is often used with external storage devices. You’ll need a new cable, like the Belkin USB-C to Micro-B Cable (USB 3.1), which is $30 in the Apple Store.

The name of the Belkin cable is confusing, because it could be mistaken for micro USB (see section just above). But if you check the product page on Belkin’s website, you can see a clear shot of the micro B SuperSpeed connector on the cable, which is quite different from micro USB. Also, Belkin sells the cable in black, while the Apple Store version is white.

How to connect an iPhone or iPad

If you are still using the USB-A to Lightning (or 30-pin, if you’re using an older iOS device) cable that came with your device, you can get the USB-C to USB Adapter mentioned above in the USB-A section.

Don’t want an adapter? Buy a $25 (1 meter) USB-C to Lightning Cable. A 2-meter version of the cable is available for $35.

How to connect the Lightning EarPods

As of this writing, it can’t be done. Apple has a Lightning to 3.5 mm Headphone Jack Adapter for connecting headphones with a 3.5mm audio plug to the iPhone 7. But what’s needed here is a female Lightning to 3.5mm audio plug or USB-C adapter.

Right now, that adapter doesn’t really exist. (Which brings up the whole issue of connectivity compatibility in Apple’s ecosystem.) There are female Lightning to USB-C adapters, like this Coolbee adapter on Amazon ($13), but it only can be used for charging and data transfers and not for audio. Also, if you take a look at the user reviews, these adapters don’t seem to be reliable.

While you wait for someone to make a reliable adapter that supports audio, you’ll have to use another pair of headphones.

How to connect headphones with a 3.5mm headphone plug

You’re in luck. The MacBook Pro comes with a 3.5mm headphone jack. Just plug it in and you’re good to go. That was easy.

macbookpro 13 tbolt3 ports

The MacBook Pro actually has a headphone jack. Really, it does.

Now, say you need a second headphone jack. You can use a splitter, like the Belkin Speaker and Headphone 3.5 mm AUX Audio Cable Splitter ($5 on Amazon). Or you can use a USB-C to headphone adapter, like this one on Amazon for $8, or you can get the $9 Google USB-C Digital to 3.5 mm headphone adapter. If you need multiple headphone jacks, the $15 Belkin RockStar 5-Jack Multi Headphone Audio Splitter plugs into the headphone jack and adds five jacks.

How to connect Thunderbolt 1 and Thunderbolt 2 devices

Older versions of Thunderbolt have a different connector than Thunderbolt 3. There aren’t any docks that have an old Thunderbolt to Thunderbolt 3 connection, so you need to buy a separate adapter.

The adapter you need is Apple’s $49 Thunderbolt 3 (USB-C) to Thunderbolt 2 Adapter.

Apple Thunderbolt 3 (USB-C) to Thunderbolt 2 Adapter

Apple Thunderbolt 3 (USB-C) to Thunderbolt 2 Adapter

At least this adapter is bi-directional. That means you can use it to connect a Thunderbolt 3 device to a Thunderbolt 1 or Thunderbolt 2 port on an older Mac.

How to connect an external display

This one can eat up a chunk of your budget, because there are so many different types of display connectors. Be prepared to buy several adapters.

DisplayPort and mini DisplayPort

To connect to a DisplayPort display, you need a USB-C to DisplayPort cable or adapter. Amazon sells the Plugable USB-C to DisplayPort Adapter cable for $22, and it supports 4K video at 30Hz.

lugable USB-C to DisplayPort Adapter

Plugable USB-C to DisplayPort Adapter

To connect a display with mini DisplayPort, you need an adapter like the Allsmartlife USB C Type to Mini DisplayPort/Mini DP Adapter Cable ($21 on Amazon).

HDMI

Apple offers the USB-C Digital AV Multiport Adapter, a $69 device that also provides a USB-A port and a USB-C port that’s for charging only.

Apple USB-C Digital AV Multiport Adapter

Apple USB-C Digital AV Multiport Adapter

If you don’t want to spend that much, you can get an adapter that’s just a USB-C to HDMI adapter, such as Aukey’s USB C to HDMI Adapter ($22 on Amazon). We really like the Nonda USB-C to HDMI Adapter ($23 on Amazon). When shopping for such adapters, look out for 1080p support. The Nonda adapter has 4K video support.

DVI

Kanex has a USB-C to DVI Adapter ($21 on Amazon). They have other USB-C video adapters, including a VGA adapter, a HDMI adapter, and a DisplayPort adapter.

VGA

To connect a VGA display, Apple has a USB-C VGA Multiport Adapter for $69. In addition to a VGA to USB-C connection, it also provides a USB-A port for connecting a USB device, and a USB-C charging port to keep your laptop battery happy.

Apple USB-C VGA Multiport Adapter

More on the affordable side but without the USB ports is the Belkin USB-C to VGA Adapter, which is available on Amazon for $33.

How to connect the MacBook Pro to ethernet

You’ll probably use Wi-Fi most of the time, but using a wired ethernet connection has its advantages. To connect to an ethernet network, you need an adapter like the Belkin USB-C to Gigabit ethernet Adapter, which is available on the Apple Store for $35.

Belkin USB-C to Gigabit ethernet Adapter

Belkin USB-C to Gigabit ethernet Adapter

How to connect SD cards

If you use a DLSR or other type of stand-alone camera, it might have a way to transfer your files wirelessly. If not, you need an adapter to access the SD card, like the SanDisk Extreme Pro SD UHS-II Card USB-C Reader ($50 on the Apple Store).

SanDisk Extreme Pro SD UHS-II Card USB-C Reader

SanDisk Extreme Pro SD UHS-II Card USB-C Reader

If you have a USB-A card reader, you can try using the Apple’s $19 USB-C to USB Adapter, or get a USB-C dock.

How to connect FireWire devices

Ugh, this one could be a problem. Apple sells a Thunderbolt to FireWire Adapter for $29, but it has a older Thunderbolt connector that doesn’t plug into the Thunderbolt 3 port on a new MacBook Pro.

Apple Thunderbolt to FireWire Adapter

Apple Thunderbolt to FireWire Adapter

You could try daisy-chaining adapters, but that’s always risky and may not work. Plug the Thunderbolt to FireWire Adapter into Apple’s $49 Thunderbolt 3 (USB-C) to Thunderbolt 2 Adapter and then plug that into the MacBook Pro.

OWC Thunderbolt 2 Dock ports.

An alternative (and pricey) solution is to get a USB dock with FireWire. For example, OWC’s Thunderbolt 2 Dock ($219 on Amazon) has a FireWire port, as well as five USB 3 ports, ethernet, HDMI, and more. You will need the Thunderbolt 3 (USB-C) to Thunderbolt 2 Adapter to connect it to the MacBook Pro, so plan on spending an additional $29 at the Apple Store. (The company recently announced a $300 Thunderbolt 3 Dock with 13 ports, including FireWire 800.)

How to connect a printer with USB-B

Many printers nowadays have wireless support, so there’s no need for a cable. But maybe you have an older printer, or you find wireless printing unreliable. Most consumer printers have a USB-B port. It’s a squarish connector, much different from USB-A or USB-C.

belkin usbc usbb cable

This black Belkin 2.0 USB-C to USB-B Printer Cable is available on Amazon. The one the Apple Store sells is white.

You need a cable like the one in the Apple Store: the $20 Belkin 2.0 USB-C to USB-B Printer Cable. Belkin sells a black version of the cable on Amazon(pictured) for $13.

If you already have a USB-C to USB Adapter, you can take the USB-A to USB-B cable that came with your printer and plug it into the adapter. Then you plug the adapter into the laptop.

How to add a MagSafe power connector to the 13-inch MacBook Pro

The power adapter that comes with the new MacBook Pro plugs into a Thunderbolt 3 port. Sadly, there is no breakaway MagSafe connector. If you’ve ever had to plug in your MacBook in a coffee shop and had someone trip over the power cable, you know how much of a lifesaver MagSafe can be.

But you can add a MagSafe connector to the new 13-inch MacBook Pro. Griffin’s BreakSafe Magnetic USB-C Power Cable ($28 on Amazon) is a power-only cable that is used to charge the laptop instead of the cable that comes with the MacBook Pro power adapter. It includes an adapter that acts like a MagSafe connector. Our review of the BreakSafe covers how it works with a 12-inch MacBook, but the breakaway connector should work the same way for the new MacBook Pro.

However, Griffin specifically states that the cable works with the 13-inch laptop; the company doesn’t say it’s compatible with the 15-inch MacBook Pro. That’s because the cable is rated at 60 watts, and the 13-inch MacBook Pro has a 61-watt power adapter. The 15-inch MacBook Pro has an 87-watt power adapter; that’s more wattage than the Griffin cable is designed to handle.

There’s also the Vinpok PokMag Bolt-S ($50 MSRP; $35 on IndieGoGo). It has a smaller breakaway USB-C connector than the BreakSafe, and the cable does support the 87W charging for the 15-inch MacBook Pro.

(macworld.com, https://goo.gl/cDML6G)

Viewing all 3641 articles
Browse latest View live